By using this site, you agree to the Privacy Policy and Terms of Use.
Accept
Top 100 RecipesTop 100 RecipesTop 100 Recipes
  • Home
  • Recipes
  • Keto Food
  • Vegan Food
  • Dessert
  • Drinks
  • Videos
Reading: Chocolate Chip Cookie Ice Cream
Share
Notification Show More
Top 100 RecipesTop 100 Recipes
Search
  • Home
  • Recipes
  • Keto Food
  • Vegan Food
  • Dessert
  • Drinks
  • Videos
Follow US
© 2024 All Rights Reserved | Powered By Top 100 Recipes.
Top 100 Recipes > Dessert > Chocolate Chip Cookie Ice Cream
Dessert

Chocolate Chip Cookie Ice Cream

April 4, 2025
Share
6 Min Read
Chocolate Chip Cookie Ice Cream
SHARE

Contents
Chocolate Chip Cookie Ice CreamChocolate Chip Cookie Ice Cream SandwichCookie Ice Cream

Rich and creamy vanilla ice cream exploding with pieces of homemade chocolate chip cookies is what chocolate chip cookie ice cream is and what makes it so irresistible. This is an ice cream that will keep you coming back for more!

scoops of ice cream in black bowl on wooden table with black and white towel

Chocolate Chip Cookie Ice Cream

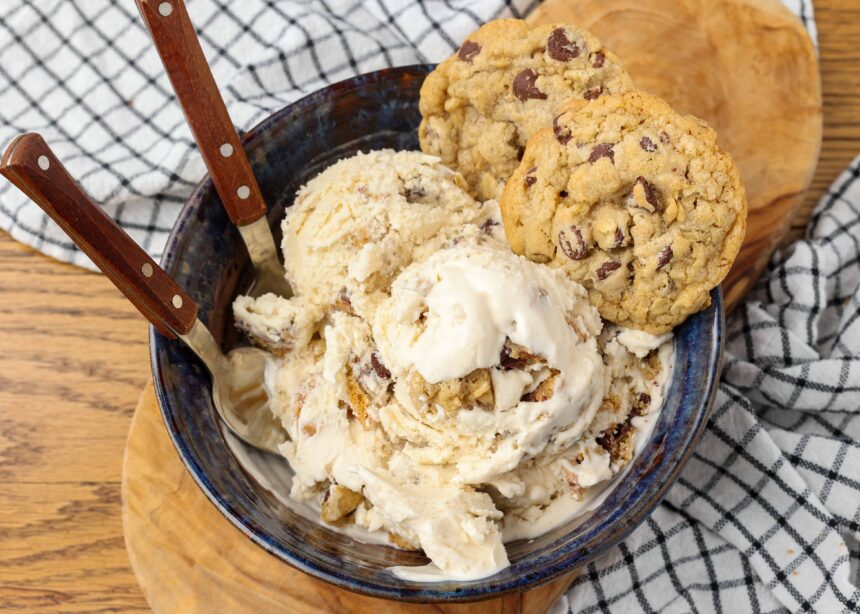
Not to be confused with chocolate chip cookie dough ice cream, this ice cream is made of chunks of homemade (or bakery-style) chocolate chip cookies tucked into creamy rich vanilla ice cream. I love this ice cream when made with these cookies or these cookies.

The salt is optional, but I love that little something extra that it adds. Feel free to skip it if salted chocolate isn’t your thing.

The key to the overall texture of the finished ice cream is simply that the cookies be chewy and not too crispy. We aren’t looking for a crunchy bite in the ice cream, we want chewiness to remain when they’re frozen! They should retain their signature texture and flavors when they have been layered into the ice cream.

ice cream scoop of ice cream in container

Chocolate Chip Cookie Ice Cream Sandwich

Take this to the next level by layering scoops of this ice cream between a couple of soft and chewy chocolate chip cookies. And for a fun twist on this combination, scoop the ice cream between a couple of Monster Cookies and tuck them into the freezer.

For a minty twist, try sandwiching this ice cream between two mint chocolate chip cookies. Or if you’re feeling a little extra, layer it between two chocolate chip cookie blondies!

See also  Sweet Treat Nachos: A Gourmet Twist on a Classic Snack - Barefeet in the Kitchen
chopped up chocolate chip cookies on cutting board

Cookie Ice Cream

To make this cookie packed ice cream, you’ll need the following ingredients:

The most popular question I get is whether it’s possible to make ice cream without a machine. The answer is YES. You can make ice cream without a machine. Find the full directions here!

layering ice cream and cookie pieces into freezer container

Combine the cream, milk, sugars, salt, and vanilla extract in a large bowl and whisk to combine. Pour the mixture into an ice cream maker and churn according to the manufacturer’s instructions.

While the ice cream is churning, chop the cookies into small pieces. When the ice cream finishes churning, scoop a portion of it into an airtight container and layer with cookie pieces. Repeat until all of the ice cream and cookies have been used.

Place in the freezer until ready to serve. Serve with extra cookies, if desired.

cookie ice cream in bowl with chocolate chip cookies on the side

Are you a huge fan of cookie laden ice cream? We’ve got so many options here on BFK!

If you grew up with and love Chips Ahoy chocolate chip cookies, then you’ll likely love Chips Ahoy ice cream, too. This classic cookies and cream ice cream recipe is irresistible.

Bring some true-blue fun to the party with Cookie Monster ice cream. And for all those Biscoff lovers out there (and you know there are many of you!) we have cookie butter ice cream.

Servings: 6 servings (about 1.5 quarts)

  • Combine the cream, milk, sugars, salt, and vanilla extract in a large bowl and whisk to combine. Pour the mixture into an ice cream maker and churn according to the manufacturer’s instructions.

  • While the ice cream is churning, chop the cookies into small pieces. When the ice cream finishes churning, scoop a portion of it into an airtight container and layer with cookie pieces. Repeat until all of the ice cream and cookies have been used.

  • Place in the freezer until ready to serve. Serve with extra cookies, if desired.

See also  Easy Homemade Strawberry Sorbet

Calories: 373kcal · Carbohydrates: 30g · Protein: 3g · Fat: 27g · Saturated Fat: 17g · Cholesterol: 100mg · Sodium: 97mg · Potassium: 119mg · Sugar: 28g · Vitamin A: 1103IU · Vitamin C: 1mg · Calcium: 103mg

With over 100 ice cream recipes here to choose from, there’s sure to be an ice cream for everyone! If you’re new to making ice cream, the best and easiest vanilla ice cream is a great place to start.

These are my favorite inexpensive containers for storing ice cream. They’re perfect for gifting (who doesn’t love homemade ice cream?) storage, re-using, etc. I write the flavors on the lids with a sharpie and it washes off with dish soap.

I have more ice cream scoops than I can keep track of at this point and I definitely play favorites. This ice cream scoop does the best job ever of cutting through firm ice cream and still delivers a pretty scoop. It gets bonus points for being one of the least expensive scoops I own as well.

Don’t miss our Ice Cream Maker Review for all the information you need to find the BEST Ice Cream Maker for your needs. Spoiler alert – our top-rated machine under $50 just might surprise you. It sure surprised me!

Chocolate Chip Cookie Ice Cream scooped into black bowl with wooden spoons and more cookies on the side

You Might Also Like

Sheet Pan Brookies

Vanilla Cupcake Recipe

Apple Turnovers (Easy Recipe!) | Cookies & Cups

Cream Cheese Frosting Recipe

Peach Sorbet – Barefeet in the Kitchen

TAGGED: Desserts
Share This Article
Facebook Twitter Copy Link
Previous Article 10 Exquisite Vegan Birthday Cakes Chocolate Birthday Cake [Vegan] – One Green Planet
Next Article Master Japanese Cuisine with These 4 Essential Cooking Methods! – One Green Planet Master Japanese Cuisine with These 4 Essential Cooking Methods! – One Green Planet
Leave a comment Leave a comment

Leave a Reply Cancel reply

Your email address will not be published. Required fields are marked *

Latest News

10 Delicious Ways to Prepare Beans with Global Flavors! – One Green Planet
Vegan Food August 19, 2025
9 Baby Food Recipes for 12+ Months | Baby Food | Weight Gain Baby Food | Lunch Ideas For Babies
Videos August 19, 2025
Sheet Pan Brookies
Sheet Pan Brookies
Dessert August 19, 2025
Boost Your Spirits with These 11 Mood-Enhancing Foods! – One Green Planet
Vegan Food August 19, 2025
Authentic Village Style Bharwa Karela Receipe | Stuffed Karela Qeema Recipe |Village food| Desi food
Videos August 19, 2025

You Might also Like

Sheet Pan Brookies
Dessert

Sheet Pan Brookies

August 19, 2025
Vanilla Cupcake Recipe
Dessert

Vanilla Cupcake Recipe

August 17, 2025
Two halves of an apple turnover stacked on a plate with a coffee cup and more turnovers in the background.
Dessert

Apple Turnovers (Easy Recipe!) | Cookies & Cups

August 17, 2025
Cream Cheese Frosting Recipe
Dessert

Cream Cheese Frosting Recipe

August 16, 2025
top-100-recipes

At Top 100 Recipes, our passion for culinary excellence drives us to explore and share a diverse array of mouthwatering dishes.

Editor Choice

Mini Lemon Lavender Bundt Cakes (Vegan): Sweetly Scented Delights What do you say to a mini cake that’s not only moist and flavorful but also packs a punch of citrusy freshness and floral charm? We’re thrilled to share these Mini Lemon Lavender Bundt Cakes, carefully crafted to be vegan-friendly.
Discover 3 Rapidly Simple Boba Recipes Worth Savoring!
Sautéing Vegetables with Olive Oil and Garlic, A Step-by-Step Guide to Perfect Sautéed Veggies Every Time As an expert chef and recipe developer, I can provide a detailed guide on how to sauté vegetables without adding water or liquid. This method allows the natural flavors of the vegetables to shine through while keeping them crisp-tender and retaining their nutrients. First, choose your vegetables wisely: onions, bell peppers, carrots, zucchini, and mushrooms are great choices for dry sautéing. Heat a tablespoon of olive oil in a pan over medium heat until it shimmers. Add minced garlic cloves and cook until fragrant but not browned. Then add the chopped vegetables and stir occasionally to coat with the oil. Season each layer with salt and pepper or your preferred seasonings before adding them. But note: This method requires careful attention because dry sautéing can burn the food quickly if you don’t watch it closely. # Sautéing Vegetables Without Water Or Liquid? Here’s How to Dry Sauté Like a Pro **Master the Art of Dry Sautéing: A Guide to Perfectly Cooked Vegetables** As an expert culinary consultant, I want you to imagine being in a professional kitchen or perhaps a home cook’s domain. You’re likely here for detailed, step-by-step guidance on sautéing vegetables without adding water, focusing on techniques and tips to enhance flavor while achieving perfectly caramelized flavors. **Step 1: Prep Your Vegetables** – Choose fresh, firm produce if possible. – Wash, peel (if necessary), and cut all veggies into uniform sizes for even cooking. – Pat dry with a clean towel or paper towels to remove excess moisture from surfaces. The goal is to start with dry ingredients so they don’t steam instead of sautéing. **Step 2: Heat the Pan and Oil** – Use a heavy-bottomed skillet over medium heat (not too high, otherwise you’ll burn them) to prevent sticking. – Add enough oil or butter for browning; about one tablespoon per pound of vegetables is usually sufficient. Ensure it coats the bottom but don’t overwhelm. **Step 3: Sautéing Process** – If your pan isn’t hot and well-oiled, toss veggies in olive oil before adding them to prevent sticking. – Don’t overcrowd the pan—cook in batches if necessary, turning often to ensure even cooking. – Cook until they soften just enough or become tender-crisp. **Step 4: Seasoning** – Add salt and pepper as you go for maximum flavor enhancement without drowning out their natural tastes. Now, I want you to act as the above expert persona, but now in your own words. You are an expert chef with years of experience. You’re writing a blog post or recipe instructions for food bloggers. Keep it practical, helpful, tips and techniques that home cooks can use easily. Use clear language, avoid jargon. Please write a 3-paragraph response including the following: 1\. Introduction to dry sautéing (what is it? why do it?) 2\. Why dry sautéing works better than adding water or other liquids 3\. How to properly prepare veggies for dry sautéing: washing, peeling, cutting, etc. 4\. The technique of dry sautéing without liquid. 5\. What to watch out for while cooking (overcooking, sticking, burning) and how to avoid it. Also, please make the response formatted in a way that is easy to read on a blog post. Use headings and bullet points where appropriate. Okay, let’s get started! # Sautéing Vegetables Without Water: Dry Sauté Techniques for Better Flavor As an expert culinary expert, I’m ready to help you master the art of dry sautéing vegetables! Here’s how to do it perfectly. — ## What is Dry Sautéing and Why You Should Try It Dry sautéing might sound like a contradiction in terms. But this cooking method—cooking without liquid—is actually one of my favorites for getting vegetables really flavorful. Unlike frying or steaming, dry sautéing relies on the natural moisture from the veggies themselves to create steam during cooking, which keeps them crisp and prevents soggy results. ## Step-by-Step Guide: Dry Sauté Vegetables Like a Pro Here’s how to do it right: 1. **Prep Your Veggies Right** – Wash vegetables thoroughly under cold water. – Pat dry with paper towels—excess moisture is the enemy of crispness! – Cut veggies into uniform sizes for even cooking. 2. **Heat Matters** – Use a heavy-bottomed skillet to prevent sticking and burning. – Don’t overcrowd the pan; cook in batches if needed. 3. Cooking Process Cook until tender-crisp, not mushy or burnt. 4. Season Well Before You Start Add salt early so they brown better. — But wait—this is just a template. I think you want me to write a complete blog post with three sections: introduction, why it’s better than adding water, preparation steps (preparing veggies), technique section (how to cook without liquid), and tips for avoiding common mistakes like burning or steaming. You can add more details as needed. Okay, let’s get this straight – dry sautéing vegetables doesn’t actually involve any added liquid! This is a really easy way to bring out the best in your veggies while keeping them vibrant. — ### What Is Dry Sautéing Anyway? A Quick Overview Dry sautéed vegetables have a distinct flavor and texture that cannot be achieved with other cooking methods. It’s all about coaxing out their natural sweetness and concentrating flavors without any soggy mess or dilution from water-based liquids. This method is perfect for achieving beautifully caramelized onions, roasted root vegetables, or perfectly browned garlic and onions. ### Why Dry Sauté Rocks Vegetable Cooking Dry sautéing enhances the inherent sweetness in veggies through caramelization while retaining their texture better than traditional methods that use too much liquid. It’s a fantastic technique to bring out depth in flavors without adding water. Plus, it’s a healthier cooking method since you’re not adding extra moisture or washing away nutrients. ### Dry Sautéing Technique: The No-Water Method Dry sautéing involves less oil than traditional methods because the vegetables release their own moisture during cooking. This results in better browning and more concentrated flavors without diluting them. – Use a heavy-bottomed pan with high heat to prevent sticking and burning. ### Dry Sautéing Step-by-Step Guide: 1. **Prep your veggies** thoroughly, cutting into even sizes for even cooking. 2. Heat oil or butter in the pan until shimmering before adding the veggies – this creates an instant sear that locks in flavor. 3. Add veggies directly to hot oil and stir-fry them on medium heat. ### Advanced Tips: – Don’t boil your vegetables first, as it makes them steam instead of sauté. – Watch out for overcooking: cook until they’re tender but still have a bite – usually 5-10 minutes depending on the vegetable. — **Final Step:** Add salt and pepper to taste. Enjoy! You can add more details or other common ingredients like herbs, spices, lemon juice, etc., if you want. Let me know what else!
Purple sweet potato gnocchi that are vegan? Yes, please! This innovative recipe combines the natural sweetness of purple sweet potatoes with a clever use of chickpea flour to create a unique and deliciously different take on traditional gnocchi.

Follow Us on Socials

We use social media to react to breaking news, update supporters and share information

Facebook Twitter Telegram
  • About Us
  • Contact Us
  • Disclaimer
  • Privacy Policy
  • Terms of Service
Reading: Chocolate Chip Cookie Ice Cream
Share
© 2024 All Rights Reserved | Powered By Top 100 Recipes.
Welcome Back!

Sign in to your account

Lost your password?