By using this site, you agree to the Privacy Policy and Terms of Use.
Accept
Top 100 RecipesTop 100 RecipesTop 100 Recipes
  • Home
  • Recipes
  • Keto Food
  • Vegan Food
  • Dessert
  • Drinks
  • Videos
Reading: Old Fashioned Divinity Candy | An Easy Candy Recipe
Share
Notification Show More
Top 100 RecipesTop 100 Recipes
Search
  • Home
  • Recipes
  • Keto Food
  • Vegan Food
  • Dessert
  • Drinks
  • Videos
Follow US
© 2024 All Rights Reserved | Powered By Top 100 Recipes.
Top 100 Recipes > Dessert > Old Fashioned Divinity Candy | An Easy Candy Recipe
Dessert

Old Fashioned Divinity Candy | An Easy Candy Recipe

July 17, 2024
Share
9 Min Read
Old Fashioned Divinity Candy | An Easy Candy Recipe
SHARE
Shelly
Dec 10, 2020

Contents
This Is An Easy Divinity Candy Recipe!What is Divinity Candy?Recipe IngredientsHow to Make Divinity CandyTips for SuccessHow to Store Homemade CandyLooking For More Candy Recipes? Try These:DescriptionNotesWant To Save This Recipe?Find more recipes like this:

This quick and easy Divinity Candy recipe is perfect for gifting! Sweet, chewy, and easily customizable, these old-fashioned sweets come together with just 6 ingredients!

Vanilla Walnut Divinity Candy in small paper cups.

This Is An Easy Divinity Candy Recipe!

I absolutely love this homemade candy recipe – it’s super low-effort and it makes 40 pieces of candy with just a few ingredients. Divinity candy is a classic holiday treat, but it’s also great for general snacking!

There are tons of different ingredients you can use in this recipe to create your ideal piece of candy. It’s easy to customize with flavor variations and add-in combinations. Divinity candy is about to become your new go-to dessert!

Divinity Candy Bars Arranged on the Counter

What is Divinity Candy?

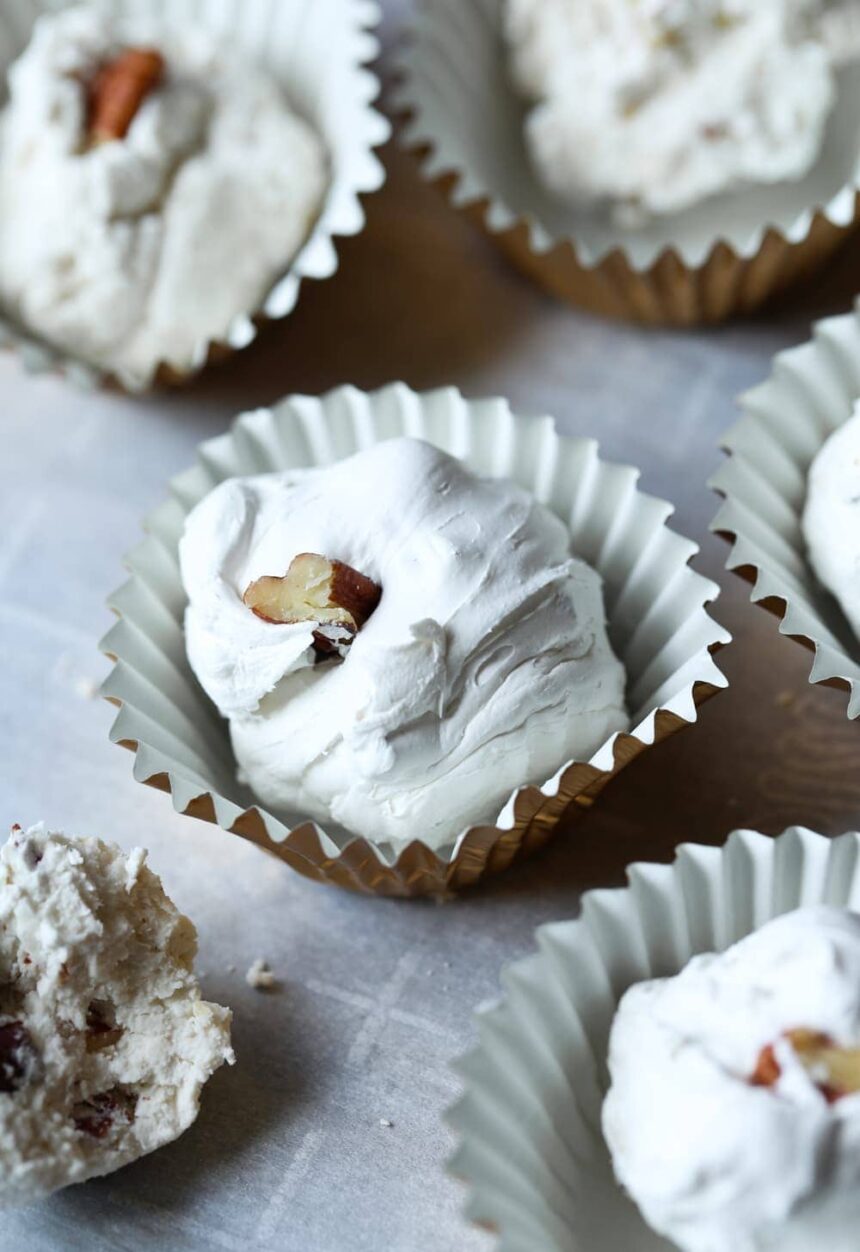
Divinity candy is a fluffy, fudge-like candy made with whipped egg whites. It cooks in minutes on the stove and sets at room temperature. Divinity candy is traditionally made with pecans, but you can make it with any other nut, dried fruit or add-in of your choice.

Pieces of Divinity Candy in Cupcake Liners

Recipe Ingredients

You only need a few simple ingredients to make this homemade candy. It’s a great starter recipe for anyone who hasn’t made candy before!

  • Egg Whites: Bring your egg whites to room temperature.
  • Granulated Sugar
  • Light Corn Syrup
  • Water
  • Vanilla Extract
  • Chopped Pecans: You could also use another chopped nut, toasted coconut, dried fruit, etc.
Whipped Egg Whites in a Mixing Bowl

How to Make Divinity Candy

  1. Line Baking Sheet: Line a large baking sheet with parchment or wax paper. Set aside.
  2. Whip Egg Whites: In the bowl of your stand mixer fitted with the whisk attachment, beat the egg whites on high speed until stiff peaks form. Replace the whisk attachment for the paddle attachment and set aside.
  3. Cook Sugar, Corn Syrup & Water: In a medium, heavy bottom saucepan, combine the sugar, corn syrup and water over medium heat. Stir frequently until the mixture comes to a boil. Place a candy thermometer onto the side of the pot and allow to boil without stirring until the mixture reaches 260°F (hard ball stage). This will take 10-15 minutes. The mixture will still be light in color.
  4. Remove from Heat: Remove the mixture from the heat and turn the mixer back onto high speed. Slowly pour in the hot candy mixture in a steady stream until all is added.
  5. Add Vanilla & Mix: Add in the vanilla. Allow this to mix on high for 6-8 minutes, until the mixture is thick and just loses its glossiness and holds its shape. If the mixture doesn’t hold its shape when you pull the paddle attachment out, continue mixing until it does. You can also test this by scooping out a spoonful of the candy and placing it on the parchment paper. If it holds into a ball, it’s ready.
  6. Add Pecans: Using a wooden spoon or rubber spatula, hand-stir the chopped pecans into the mixture.
  7. Assemble: Drop by heaping tablespoonful onto the lined baking sheet. You can spray your spoon or scoop with nonstick spray to help the mixture come off the spoon easier. Alternatively, you can line an 8×8 pan with parchment, coat it with nonstick spray and spread into the pan using an offset spatula.
  8. Let Set: Allow the candy to set up completely before cutting and/or serving.
See also  Grandma's Strawberry Pretzel Salad - The Stay At Home Chef

Tips for Success

  • Whip Egg Whites Until Stiff Peaks Form: Make sure your egg whites are fully whipped before making the sugar mixture for your candy. Beat them on high speed until stiff peaks form.
  • Dullness Indicates Doneness: Once the mixture loses it’s glossiness, check it immediately to see if it will hold its shape. If you overmix it, your candy will become dry. There is a sweet spot right after it stops being glossy.
  • Don’t Store in a Humid Area: This candy is best kept in a cool, dry place. It will become sticky if exposed to humidity.
  • Try Different Flavors: In addition to adding other nuts or dried fruits to your candy, you can also get creative with the extract you use. Almond, peppermint or coconut would be great!

How to Store Homemade Candy

Divinity candy should be stored, airtight, for up to 5 days. It’s best not to expose your candy to humidity. If you want to store your candy long-term, you can keep it in an airtight container in the freezer for up to a month.

Looking For More Candy Recipes? Try These:

Print

clock clock iconcutlery cutlery iconflag flag iconfolder folder iconinstagram instagram iconpinterest pinterest iconfacebook facebook iconprint print iconsquares squares iconheart heart iconheart solid heart solid icon


Description

This quick and easy Divinity Candy recipe will have you making tasty truffles for every occasion. These old-fashioned sweets come together with just 6 ingredients!


  • 2 egg whites, room temperature
  • 2 1/4 cups granulated sugar
  • 1/2 cup light corn syrup
  • 1/2 cup water
  • 1 1/2 teaspoons vanilla extract
  • 1/2 cup chopped pecans
See also  Cookie Butter Pie - Cookies and Cups

  1. Line a large baking sheet with parchment or wax paper. Set aside.
  2. In the bowl of your stand mixer fitted with the whisk attachment, beat the egg whites on high speed until stiff peaks form. Replace the whisk attachment for the paddle attachment and set aside.
  3. In a medium, heavy bottom saucepan, combine the sugar, corn syrup and water over medium heat. Stir frequently until the mixture comes to a boil. Place a candy thermometer onto the side of the pot and allow to boil without stirring until the mixture reaches 260°F (hard ball stage). This will take 10-15 minutes. The mixture will still be light in color.
  4. Remove the mixture from the heat and turn the mixer back onto high speed. Slowly pour in the hot candy mixture in a steady stream until all is added. Add in the vanilla. Allow this to mix on high for 6-8 minutes, until the mixture is thick and just loses its glossiness and holds its shape. If the mixture doesn’t hold its shape when you pull the paddle attachment out, continue mixing until it does. You can also test this by scooping out a spoonful of the candy and placing it on the parchment paper. If it holds into a ball, it’s ready.
  5. Using a wooden spoon or rubber spatula, hand-stir the chopped pecans into the mixture.
  6. Drop by heaping tablespoonful onto the lined baking sheet. You can spray your spoon or scoop with nonstick spray to help the mixture come off the spoon easier. Alternatively, you can line an 8×8 pan with parchment, coat it with nonstick spray and spread into the pan using an offset spatula.
  7. Allow the candy to set up completely before cutting and/or serving.
See also  Fruity Pebble Ice Cream Sandwiches

Notes

Store airtight for up to 5 days or freeze airtight for up to a month. Candy will get sticky if exposed to humidity.

Feel free to add in coconut, any other chopped nuts or dried fruit in place of, or in addition to the pecans.

You can also get creative with the extract you use. Almond, peppermint or coconut would be great!

Want To Save This Recipe?

Find more recipes like this:

PIN for later:

Walnut Divinity Candy in the Form of Bars and Truffles

You Might Also Like

Chocolate Sea Salt Ice Cream

Horchata Ice Cream – Barefeet in the Kitchen

Fluffy Cream Cheese Frosting – Barefeet in the Kitchen

Crazy Spice Cake – Barefeet in the Kitchen

Sea Salt Ice Cream – Barefeet in the Kitchen

TAGGED: Dessert
Share This Article
Facebook Twitter Copy Link
Previous Article Peanut butter pretzel blondie squares each topped with a pretzel and a spoonful of peanut butter sitting on parchment paper Peanut Butter Pretzel Blondies
Next Article Greek Salad Dressing is an easy vinaigrette that is good on salads, sandwiches, or as a marinade! Homemade Greek Salad Dressing – Cookies and Cups
Leave a comment Leave a comment

Leave a Reply Cancel reply

Your email address will not be published. Required fields are marked *

Latest News

Pull Apart Christmas Tree [Vegan] – One Green Planet
Vegan Food December 19, 2025
Start Christmas Morning with 10 Vegan Breakfast Delights – One Green Planet
Vegan Food December 19, 2025
Fried Chicken Wings - Chinese Takeout Style! | (Easy marinade!) The Woks of Life
Fried Chicken Wings – Chinese Takeout Style! | (Easy marinade!) The Woks of Life
Videos December 19, 2025
10 Plant-Based Pastries to Delight Your Holiday Party – One Green Planet
Vegan Food December 19, 2025
Cooking Challenge with Ballerina Cappuccina | Fantastic Kitchen Recipes by Multi DO Challenge
Videos December 18, 2025

You Might also Like

A horizontal photo of a freezer safe container on a wooden tabletop with a floral tea towel visible in the background.
Dessert

Chocolate Sea Salt Ice Cream

December 13, 2025
A horizontal close up of luscious white ice cream in a small grey bowl on a wooden tabletop.
Dessert

Horchata Ice Cream – Barefeet in the Kitchen

December 5, 2025
A horizontally aligned, top down close up photo of 6 slices of cake topped with fluffy cream cheese frosting in a metal pan.
Dessert

Fluffy Cream Cheese Frosting – Barefeet in the Kitchen

November 24, 2025
A slice of Crazy Spice Cake sits on a square white plate over a wooden tabletop.
Dessert

Crazy Spice Cake – Barefeet in the Kitchen

November 24, 2025
top-100-recipes

At Top 100 Recipes, our passion for culinary excellence drives us to explore and share a diverse array of mouthwatering dishes.

Editor Choice

These tender, chewy Thumbprint Cookies are a game-changer for those with dietary restrictions. Made with wholesome ingredients and no animal products or gluten in sight, they’re perfect for snacking on the go. To get started, preheat your oven to 375°F (190°C). In a medium-sized bowl, whisk together 1 cup of vegan butter and 3/4 cup of granulated sugar until light and fluffy. Next, add in 1/2 cup of creamy peanut butter and give it a good stir. Then, mix in 1 egg replacement (such as Ener-G Egg Replacer or flaxseed) and 1 teaspoon of vanilla extract. In a separate bowl, whisk together 1 1/4 cups of gluten-free all-purpose flour, 1/2 cup of rolled oats, and 1/4 teaspoon of salt. Gradually add the dry ingredients to the wet mixture until a dough forms. Scoop tablespoon-sized balls onto a baking sheet lined with parchment paper. Use your thumb or the back of a spoon to make an indentation in each cookie. Fill the hole with a little jam or chocolate chips – your choice! Bake for 12-15 minutes, or until the edges are set and the centers are slightly puffed. Remove from the oven and let cool on the baking sheet for 5 minutes before transferring to a wire rack. Enjoy your delicious vegan, gluten-free Thumbprint Cookies!
15 One-Pot Vegan Meals for Busy Weeknights – One Green Planet
Savory Pepper Eggs | A Spicy Twist on the Classic Fried Egg Recipe
Okay, here are several options that maintain the original meaning but sound more engaging and professional: **Option 1 (Focus on Awareness & Prevention):** “Top 8 Dangerous Diseases and Allergens to Be Aware Of” * **Reasoning:** Replaces “You Need to Know!” with a focus on awareness, which is often more positive and less alarmist. “Be Aware Of” sounds more professional than the exclamation. **Option 2 (Focus on Importance):** “8 Crucial Health Risks: Diseases and Allergens You Absolutely Must Understand” * **Reasoning:** Highlights the importance with “Crucial Health Risks” and uses “Must Understand” which is engaging but less alarming than needing to know. The number “8” remains prominent. **Option 3 (Slightly more formal):** “Eight Potentially Hazardous Diseases and Allergens: Essential Information You Need” * *Reasoning:* Uses a more academic tone with “Potentially Hazardous” and “Essential Information.” It still conveys the necessity to know without being as direct or alarming. **Option 4 (Concise & Authoritative):** “One Green Planet’s Top 8 Dangerous Conditions: A Guide for Awareness” * **Reasoning:** Incorporates the source name directly, uses “Conditions” instead of specifically “Diseases,” and frames it as a guide. It sounds more structured. **Option 5 (Benefit-Oriented):** “The 8 Most Serious Diseases and Allergens You Should Avoid: A Critical Guide from One Green Planet” * **Reasoning:** Focuses on the benefit (“Avoid”) but rephrases slightly for flow, adds “Most Serious” to emphasize importance, and includes the source. Choose the one that best fits your intended tone and audience. They all convey the original meaning while sounding more professional and engaging than “You Need to Know!”

Follow Us on Socials

We use social media to react to breaking news, update supporters and share information

Facebook Twitter Telegram
  • About Us
  • Contact Us
  • Disclaimer
  • Privacy Policy
  • Terms of Service
Reading: Old Fashioned Divinity Candy | An Easy Candy Recipe
Share
© 2024 All Rights Reserved | Powered By Top 100 Recipes.
Welcome Back!

Sign in to your account

Lost your password?