
This Halloween display is incredibly simple to prepare and embellish! Discover the spooky simplicity of transforming a box of cake mix, frosting, and Oreo cookies into a charming miniature Halloween masterpiece adorned with intricate cobwebs and creepy crawlies.
Looking for a spellbinding treat to cast a sweet spell on your guests? Try our bewitching tutorials on crafting cauldron cupcakes and skeleton Halloween cupcakes, sure to delight both young and old. Utilize your remaining sweets to craft a show-stopping Halloween candy cake.

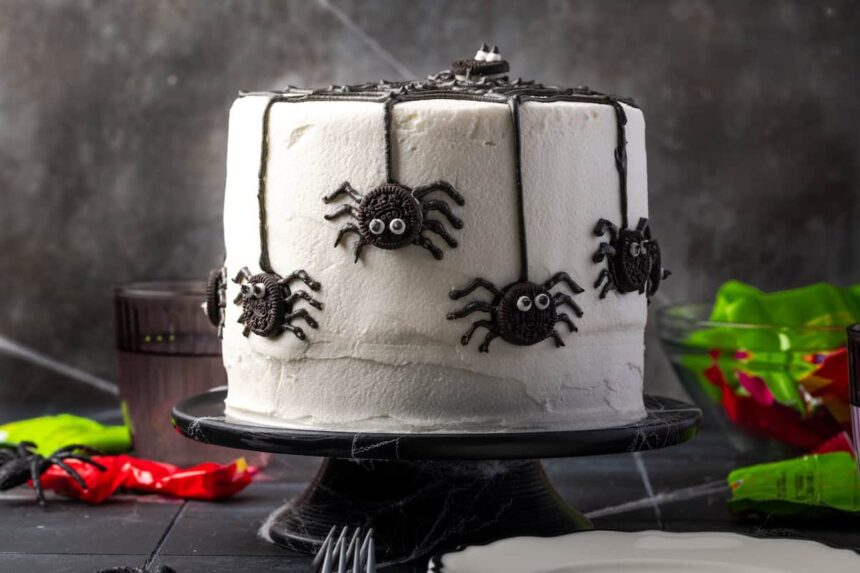
This show-stopping Halloween spider cake boasts vibrant orange layers smothered in a rich, creamy frosting, featuring a intricate chocolate and vanilla buttercream spider web design and tiny, edible Oreo spiders adding an eerie allure. What a delightful discovery – the treat’s adorable appearance belied its simplicity in preparation.
Starting with a pre-mixed cake blend significantly reduced preparation time, making the baking process more efficient. The reason I find this tutorial so compelling is that…
- With just a few creative touches, you can transform a humble layer cake into a spine-tingling spider cake. This tutorial employs a straightforward approach, utilizing merely two shades of frosting and a simple piping method to craft the distinctive “web” design. Mastering the art of piping frosting requires patience and practice, but with time, you’ll achieve seamless results.
- No fuss required: simply spread frosting on your cake! A reusable container with a precut ventilation slot performs admirably in this situation.
- I adore this 6-inch masterpiece as it’s an ideal centerpiece for Halloween gatherings or a creative spin on a spider-inspired birthday celebration. Transform this dessert into a one-of-a-kind masterpiece by incorporating an assortment of festive candies, cookies, and other decorative elements that reflect your unique style and flair for the spooky season.

To conjure a bewitching spider cake for Halloween celebrations, gather the following essential ingredients and decorations:
- Select your go-to boxed cake mix, either a classic white or sunny yellow variety. Why not indulge in a personal touch by baking the cakes from scratch using your trusted homemade recipe?
- – Orange food dye, used to add a vibrant hue to the cake, pairs perfectly with black food dye, which adds depth and sophistication to the frosting. While food colouring gels may offer greater intensity, I suggest exploring other options to achieve the desired hue. Small efforts yield significant results.
- With precision, I pipe the signature vanilla buttercream onto the cake before delicately crafting intricate spider webs using store-bought chocolate frosting infused with subtle hints of black food dye. Consider whipping up a rich and creamy batch of your signature homemade chocolate buttercream for the ultimate indulgence? You can also consider using ready-to-use black decorative icing, such as Wilton’s offering.
- Using Mini Oreos as the spider bodies was a clever touch. A rich, dark biscuit would work well in this recipe.

Let’s prepare our cake layers for frosting and decorating the spider cake. This tutorial offers a straightforward approach, with the spider web design providing an excellent opportunity to hone your piping skills.
First, Bake the Cake
I opt for convenience by using a store-bought cake mix to streamline the process; feel free to get creative and bake three 6-inch layers of your go-to homemade yellow cake instead. Here’s what to do:


- Combine the cake batter ingredients in accordance with either the instructions provided on the packaging of your boxed mix or the specifications outlined in your go-to recipe. Subsequently, add a couple of drops of vibrant orange food dye to complete the mixture.
- The batter is divided uniformly among three well-greased 6-inch cake pans, then subjected to a gentle warmth. Easy peasy!
Next, Assemble the Cake
Before frosting your baked cakes, it’s essential to allow them to cool down completely. Freshly made buttercream will slide right off a still-warm cake, ensuring a smooth and even spread. Permit the cakes to reach room temperature before constructing your multi-tiered masterpiece by carefully stacking each layer in a harmonious sequence.


- Position the first cake layer upon a serving plate, ensuring a stable foundation for the subsequent layers to come. To ensure the cake remains stable, I prefer applying a thin layer of frosting at the bottom before serving. Using a large open-round piping tip or a makeshift piping bag crafted from a Ziploc bag’s corner (snipped for easy flow), apply a generous, thick layer of rich vanilla buttercream along the outer perimeter of the cake, replicating the visual depicted.
- Using an offset spatula, carefully spread a layer of rich, velvety dark chocolate frosting within the delicate borders of the creamy vanilla frosting. With the remaining batter, place the second cake layer over the top, and then repeat this process until all of the batter is used up.


- With the third and final cake layer in place, complete the cake’s exterior by covering the top and sides with the remaining vanilla frosting.
To create an awe-inspiring spider cake, start by preparing your baking tools and ingredients: whisk together one cup of milk, two teaspoons of baking powder, and half teaspoon of salt; in a separate bowl, cream 1/2 cup of butter with three cups of powdered sugar until light and fluffy, then add two large eggs and mix well.
Finally, discover how to adorn your frosted layer cake with an eerie, whimsical cobweb and Oreo spiders that will delight trick-or-treaters of all ages?
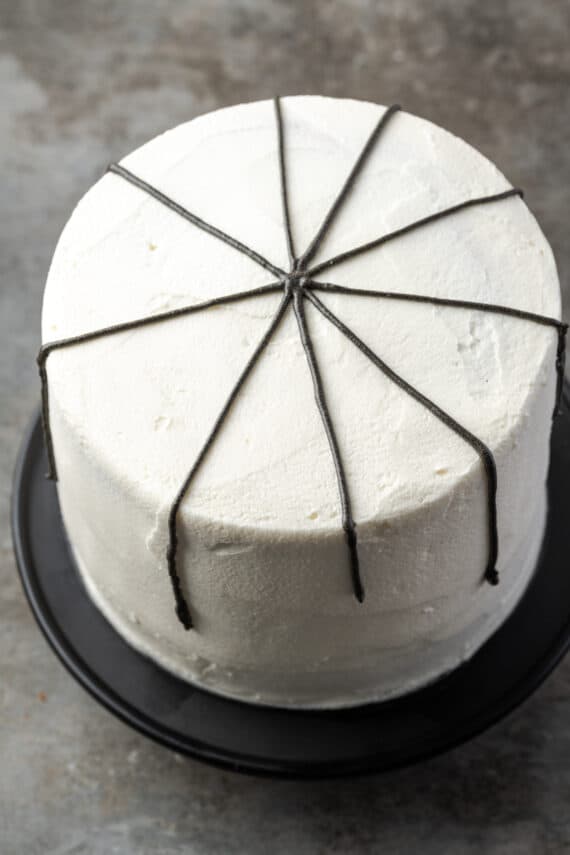
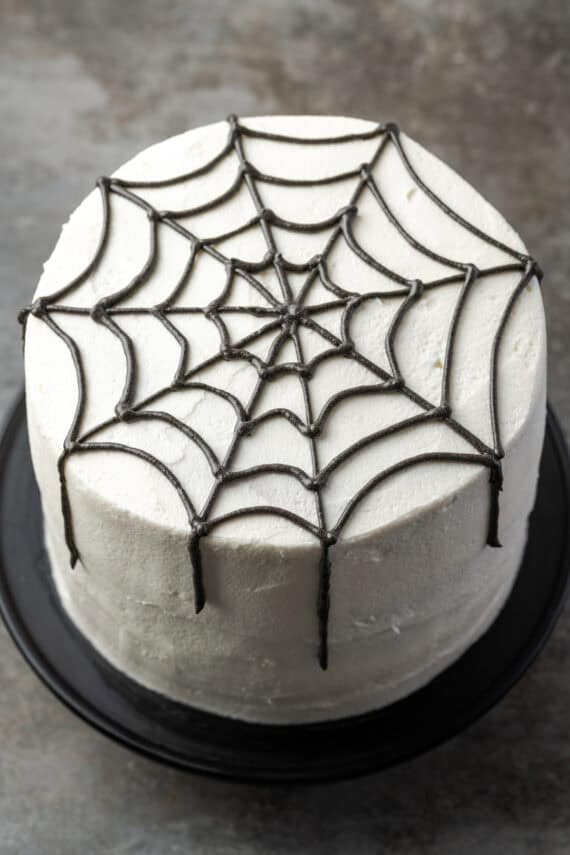
- I piped intricate designs onto the cake using the precision of the #4 tip to create delicate, uniform lines. As the frosting flows, delicately piped into intricate webs across the surface of the cake, its sweet aroma wafts upwards. I carefully crafted a delicate web along the edge of the cake, allowing my tiny “spiders” to suspend in mid-air.


- Embed Mini Oreos into the cake’s periphery, forming a visually appealing pattern that harmonizes with the overall design. Using the remaining white and black frosting, carefully craft the spiders’ legs and eyes, bringing the arachnid characters to life.

- When new to piping frosting, take a few trial rounds on a large sheet of parchment paper beforehand. Mastering the motion of guiding the piping tip into a web pattern is essential before showcasing your artistic abilities on a cake.
- When crafting a spider cake, creativity knows no bounds – let your imagination run wild and transform this sweet treat into a masterpiece. Why settle for ordinary treats when you can spin a sweet surprise? Instead of traditional Oreos, craft colorful spiders using Lifesaver candies, their vibrant hues weaving a spell of delight. Add gummy bugs to the web for an eerie-cute twist or incorporate Halloween-themed sprinkles in pops of orange and black for a fiendishly festive flair. The sky’s the limit.
- Mistakes are an opportunity to learn and grow; they shouldn’t be a source of stress or anxiety. You can easily fill in any remaining space with a creative touch, such as an Oreo spider, additional frosting, or other candies and decorations. Your scrumptious spider cake is sure to delight, regardless of any minor mishaps that may occur during preparation.

- To maintain freshness and quality, once the cake is frosted, store it in an airtight container, such as a cake carrier, to prevent air exposure and moisture absorption. Stored at room temperature for up to two days, provided the surrounding environment is neither excessively warm nor humid. Otherwise, store the cake in the refrigerator and allow it to come to room temperature before serving.
- While I wouldn’t advise freezing a frosted cake, you can certainly prepare the cake layers in advance and store them in the freezer if needed. Wrapped securely in two layers of plastic wrap, the cooled cakes can be frozen for up to one month without compromise. Ensure the cakes are thoroughly defrosted prior to assembly and decoration.
Description
Here’s a simple yet impressive dessert that’s perfect for any occasion: This tutorial transforms a box of cake mix, frosting, and Oreo cookies into a delightfully spooky Halloween cake adorned with eerie cobwebs and playful spiders.
- Boxed yellow cake mix (along with the ingredients specified on the packaging).
- Orange food coloring gel
- Black food coloring gel
- What’s your take on a timeless classic? Here’s a recipe for the most divine vanilla buttercream you’ve ever tasted:
1 3/4 cups (450g) unsalted butter, softened to a creamy dream
2 3/4 cups (560g) powdered sugar, sifted with finesse
1/2 teaspoon pure vanilla extract, a hint of heavenly delight
1/2 teaspoon salt, the perfect balance of flavorsIn a medium-sized bowl, whisk together the butter and powdered sugar until smooth, like a cloud on a sunny day. Add in that lovely vanilla extract and salt; mix until well combined.
Now, for the grand finale:
1 tablespoon whole milk, or more as needed
A pinch of red food coloring, optional (but oh-so-fun!)Adjust the consistency to your liking by adding more milk, a teaspoon at a time. If you’re feeling extra fancy, add a splash of color to make it pop!
There you have it – the perfect recipe for a buttercream that’s simply sublime!
- can of chocolate frosting
- package of Mini Oreos
- Preheat oven to moderate temperatures. Grease three 6-inch cake pans generously with a non-stick cooking spray, ensuring even coverage. Set the prepared pans aside for future use.
- Prepare the cake batter precisely as instructed on the packaging. Infuse the batter with a vibrant hue by adding a few drops of intense orange food coloring gel, transforming the mixture into a radiant shade that’s sure to delight kids and adults alike.
- The batters are portioned out equally among the prepped cake pans before being baked in accordance with the packaging guidelines. Let the cakes cool completely.
- Prepare a batch of creamy, sweet vanilla buttercream frosting by combining one and three-quarter cups of powdered sugar, two and three-quarters tablespoons of unsalted butter softened to room temperature, two and one-half teaspoons of pure vanilla extract, and four to six tablespoons of whole milk or heavy cream until smooth, silky, and utterly divine. Add a few drops of black food coloring gel to the canned chocolate frosting and mix until the desired shade is achieved.
- Position the initial cake layer upon a plate. Utilizing a generous, rounded piping tip, elegantly adorn the exterior of the cake with a delicate border of creamy vanilla buttercream.
- Adorn the perimeter of the vanilla buttercream with a rich, velvety black frosting, carefully applied by hand using an offset spatula. Position the second cake layer atop the initial one, followed by a duplication of the process, before carefully placing the third and conclusive layer in its designated position.
- With the cake assembled and its core filled, utilize the residual vanilla buttercream to generously coat the exterior surfaces, ensuring a smooth and even finish.
- With a steady hand, add a generous dollop of rich, dark black frosting to the piping bag, ensuring a snug fit around the #4 decorating tip. Assemble delicate swirls of frosting into an intricate web design that stretches across the cake’s surface, flowing elegantly down its sides to create a masterpiece of confectionery artistry. These threads will serve as the delicate suspension system for the spiders’ intricate webs to unfold.
- Embed Press Mini Oreos into the cake as desired. With any remaining white and black frosting, delicately pipe on the cake’s legs and eyes for a finishing touch.


![Berry Lavender Poached Pears With Granola [Vegan, Gluten-Free] – One Green Planet](https://top-100-recipes.com/wp-content/uploads/2026/03/berry-lavender-poached-pears-with-granola-d-150x150.jpg)