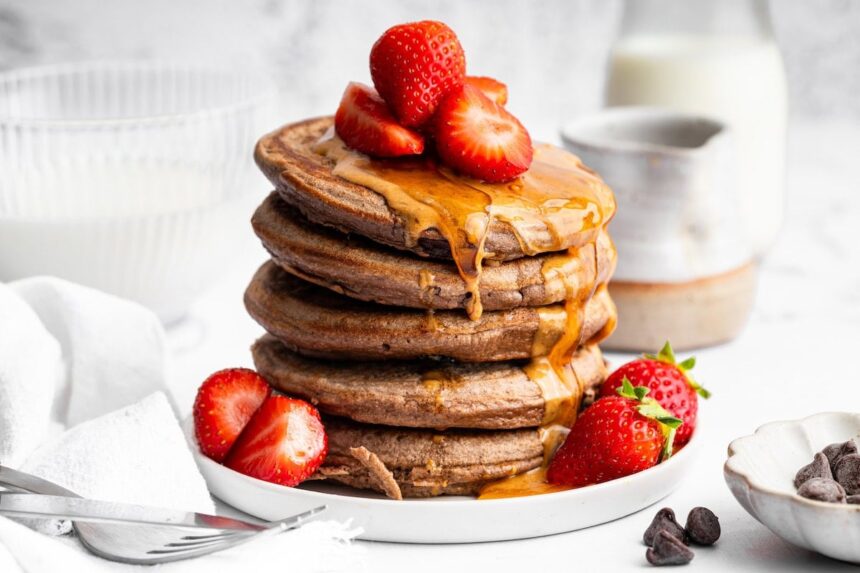
Enjoy chocolate for breakfast with these soft and fluffy chocolate protein pancakes! They’re made with just 7 ingredients and loaded with over 25g protein per serving for a healthy, high-protein breakfast.
A few months back I made chocolate protein pancakes using Kodiak mix, and while they were quick and tasty, I really wanted a version that didn’t rely on a mix. I also wanted something gluten-free that anyone could enjoy.
So, I used my classic protein pancakes recipe as a guide to create this rich and chocolatey version. It has quickly become a new favorite breakfast in our house and I can’t wait for you to try it!
Why I Love These Chocolate Protein Pancakes
- Quick & easy: The batter comes together in minutes and the pancakes cook up fast, so you can have a healthy breakfast on the table in about 15 minutes.
- Simple ingredients: You only need 7 basic ingredients that you probably already have in your kitchen.
- High-protein & low-sugar: Each serving has over 25 grams of protein and just 3 grams of sugar, which makes these pancakes super satisfying without the sugar crash.
- Filling breakfast: Thanks to the protein from the protein powder and fiber from oat flour, these pancakes actually keep me full for hours.
- Meal prep friendly: Make a batch ahead of time, store in the fridge, and reheat for a quick breakfast during busy mornings.
Ingredients Needed
- oat flour – a naturally gluten-free flour that adds fiber and helps keep the pancakes light and fluffy. You can buy it or make homemade oat flour by blending rolled oats into a fine flour.
- chocolate protein powder – the star ingredient that boosts the protein content to over 25g per serving. I used Equip Prime Protein (use the code eatingbirdfood for up to 35% off), but any chocolate protein powder you enjoy should work.
- cocoa powder – adds an extra layer of rich chocolate flavor.
- coconut sugar – a small amount of natural sweetness that keeps the sugar low (just 3g per serving). You can also use maple syrup, honey, or your favorite granulated sweetener.
- caking powder – helps the pancakes rise and stay fluffy.
- milk – I used unsweetened almond milk, but dairy milk or another non-dairy milk will work just fine.
- eggs – add structure, protein, and help the pancakes hold together.
- chocolate chips – this is optional, but I like adding chocolate chips for an extra indulgent touch of melty chocolate in every bite.
How to Make Chocolate Protein Pancakes
Step 1: In a bowl, whisk together oat flour, protein powder, cocoa powder, coconut sugar, and baking powder.
Step 2: Add milk and eggs to the bowl with the dry ingredients.
Step 3: Stir mixture together until everything is combined.
Step 4: Heat a pan over medium-low heat. Pour ¼ cup batter for each pancake. Add chocolate chips on top if using. Cook 3–5 minutes, until bubbles form, then flip and cook 2–3 minutes more, until set in the center.
Tips For Success
- Use the right protein powder: Not all protein powders work the same in baking. I used Equip Prime Protein (a beef isolate), which blends smoothly without drying out the pancakes. Whey protein usually works well, but plant-based powders can absorb more liquid, so you may need to add extra milk to thin the batter. If the batter looks too thick to pour, whisk in 1–2 tablespoons more milk.
- Stick with oat flour: It keeps these pancakes gluten-free and gives them a light, fluffy texture. Almond flour or coconut flour won’t work as a 1:1 swap here.
- Cook on medium-low heat: Protein pancakes brown faster than regular pancakes. Keeping the heat a little lower ensures they cook through without burning.
How to Store & Meal Prep
These chocolate protein pancakes are great for meal prep and can easily be made ahead of time. Here’s how to properly store them and tips for meal prepping:
- Refrigerator: Store cooled pancakes in an airtight container for up to 4–5 days.
- Freezer: For longer storage, freeze pancakes in a single layer on a baking sheet until firm, then transfer to a freezer-safe bag or container. They’ll keep well for up to 3 months.
- Reheating: Warm in the toaster, microwave, or a skillet until heated through. I love using the toaster because it brings back that fresh, slightly crisp edge.
- Meal prep tip: Make a double batch, portion into containers with your favorite toppings (like berries or nut butter), and store in the fridge for grab-and-go breakfasts all week.

![Roasted Parsnip and Horseradish Dip [Vegan] – One Green Planet](https://top-100-recipes.com/wp-content/uploads/2026/03/Parsnip-Horseradish-Dip-150x150.jpg)