This whimsical nod to the beloved Little Debbie treat is sure to delight! This rich and decadent homemade chocolate cake is generously filled and lavishly frosted with an indulgent cream-based fudge frosting.
I revel in revamping nostalgic lunchbox treats into scrumptious, from-scratch sweets that delight my loved ones. Indulge in the delightful treats inspired by beloved Girl Scout cookies – try our Oatmeal Cream Pies and Tagalong Bars!

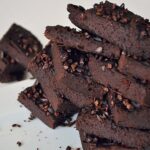
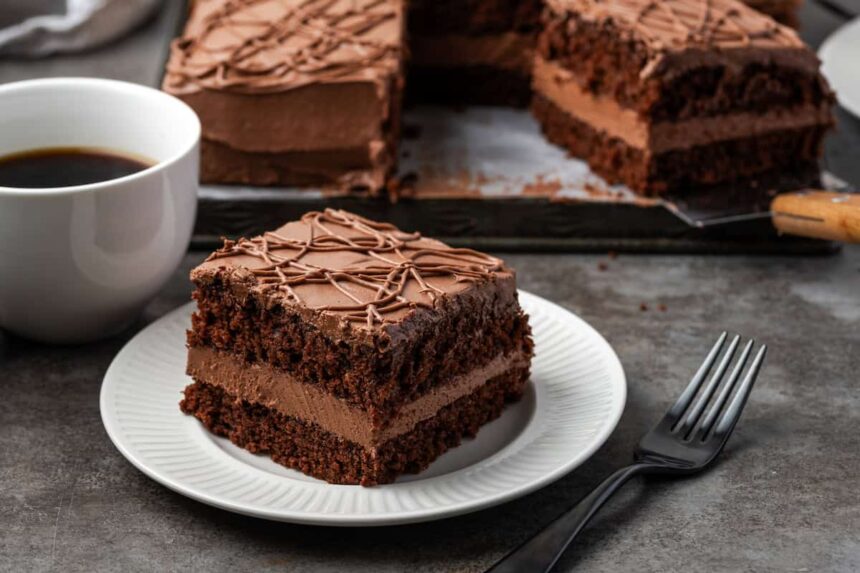
Today, I’m thrilled to share an oversized and indulgent rendition of my beloved childhood treat, the iconic Frosted Fudge Cake. This rich, indulgent masterpiece boasts two velvety layers of moist, homemade chocolate cake, carefully separated by a generous helping of sumptuous, creamy chocolate frosting that oozes with every bite. The slices resemble the snack cakes from my childhood vividly. I revel in the sensory delight of swirling the frosting on top of the cake, a nostalgic indulgence that transports me back to cherished moments. Here’s why I’m absolutely delighted with this culinary creation:
- As a child, I indulged in the sweet treats of Little Debbie’s Frosted Fudge Cakes. These are a timeless favourite in many people’s lunchboxes. As an adult, I’m thrilled to be living my best life with this indulgent jumbo sheet cake.
- This indulgent fudge cake is surprisingly both richly decadent and airy, its textures harmoniously balanced in a delightful culinary surprise. The crucial components of a superior batter reside in the harmonious blend of oil and cornstarch. With meticulous testing and precision in balancing the perfect blend of ingredients, I confidently declare this to be the ultimate chocolate cake.
- Two separate containers are required: one for the cake batter and another for the frosting. That’s it! Clean-up is a breeze.
- By baking the cake mixture in a 9×13-inch pan, I simplify the process and produce a single cake with two layers once it’s cut and served. Baking a cake and decorating it with a simple frosting is a straightforward process that requires minimal time and effort. A simple start to baking awaits you with this easy-to-follow recipe.

A few key components transform this rich chocolate fudge cake into an indulgent treat, boasting a remarkable balance of moisture, density, and airiness. Below are some quick notes.
- With essential baking staples such as sugar and salt at the ready, you’ll also require baking soda and baking powder to provide the necessary lift and structure in your baked goods. Verify that your baking soda and baking powder are still within their shelf life by checking the expiration dates.
- Cornstarch combines with all-purpose flour to mimic the properties of cake flour, effectively tempering the gluten content and yielding a tender, softer crumb in cakes.
- While I recommend using natural, unsweetened cocoa powder, Dutch-processed cocoa powder is also a suitable alternative. Why does the cake consistently turn out darker?
- Best results are achieved at room temperature.
- Any neutral-tasting vegetable oil, such as canola or avocado oil, will suffice. Unlike butter, which solidifies at room temperature, oil remains liquid. When baked with oil, chocolate cakes and cupcakes retain their softness and tenderness for a more extended period.
- Ensure you’re using authentic vanilla extract. You can also substitute vanilla paste in equal parts.
- Here’s a revised recipe for an even fudgier take on our popular creamy chocolate buttercream frosting: Feel free to use either a store-bought or homemade frosting of your choice.
Here are the straightforward steps to create a mouthwatering full-sized frosted fudge cake from scratch in the comfort of your own kitchen: This comprehensive overview, accompanied by engaging photographs,


- Combine the dry ingredients in a bowl, gradually whisking in the wet ingredients to form a cohesive, velvety batter. That’s perfectly fine; it’ll be slender, and that’s acceptable.
- Pour the rich, velvety chocolate cake batter into a greased and parchment-lined 9×13-inch baking pan. Bake in a preheated oven at 350°F (175°C) for 40-45 minutes, or until a toothpick inserted into the centre of the cake emerges clean. Let the cake rest undisturbed in its pan until it reaches room temperature.


- While preparing the frosting, whisk together the combined ingredients in a bowl. Begin by combining ingredients at a leisurely pace, then incrementally increase the tempo as desired. Whip the frosting for 2-3 minutes until it becomes light, airy, and incredibly fluffy.
Assembling and Frosting the Cake
Will you utilize a single batch of chocolate frosting to both fill and top your fudge cake, as well as enhance its visual appeal? Before you begin, you’ll need to get started by dividing your project into manageable tasks and setting clear goals for yourself? With a velvety texture and generous consistency, this frosting is poised to seamlessly fill the cake’s voids.
Reserve approximately 2.5 cups of frosting for exterior coverage and decoration; proceed as follows:


- Remove the cooled cake from the pan. Slice the cake horizontally into two even layers, ensuring a precise and uniform separation that allows for easy assembly of the dessert. Arrange the top half of the dish onto a serving platter.
- Generously spread a rich, velvety frosting evenly over the surface of the first cake layer. With precision, position the second cake layer atop the initial one.


- I mix two cups of the reserved frosting with a splash of milk, creating a thinner consistency that I then use to generously frost the top and sides of the cake. The velvety-smooth frosting perfectly replicates the iconic appearance of Little Debbie’s signature cakes.
- Who’s to say a Little Debbie-inspired treat isn’t perfect just the way it is? The fudgy goodness within already speaks volumes. With the remaining ½ cup of frosting, I insert the tip into a Ziploc baggie and carefully cut one corner at an angle for precise application. Pipe swirling patterns of artistic flair across the frosted cake, surrendering to the creative muse with abandon.

- For detailed guidance on assembling your cake, refer to my comprehensive guide on building a flawless chocolate layer cake.
- To avoid the daunting task of halving a substantial cake, consider baking it in two separate 9×13-inch pans instead. Divide the batter evenly into two portions to ensure consistent results. In this scenario, you might want to consider shortening the baking period to achieve the desired outcome.
- Need a speedy alternative to this frosting? Try our 2-Ingredient Chocolate Buttercream Hack! This decadent delight would equally excel when topped with a rich, velvety chocolate cream cheese frosting.

- This frosted fudge cake will keep safely in an airtight container at room temperature for as long as three days. Consider storing leftovers in the fridge, tightly wrapped, then allowing them to reach room temperature before serving for optimal flavor and texture.
- To ensure a smooth and even frosting process, it’s essential to chill the cake layers in the refrigerator until they’re firm prior to applying the final layer of frosting. Divide the cooled chocolate cake into two equal portions, following the original instructions, and subsequently encase each layer in a protective barrier of plastic wrap to preserve freshness. Store frozen cakes flat for up to a month, then thaw them in the refrigerator prior to assembly.
Description
Indulge in a whimsical twist on the beloved Little Debbie treat, where velvety softness meets rich, fudgy indulgence – each bite a masterclass in contrasting textures and tastes as the moist cake is lavishly smothered in a generous helping of creamy, dreamy frosting.
- granulated sugar
- all-purpose flour
- cornstarch
- unsweetened cocoa powder
- baking powder
- baking soda
- kosher salt
- large eggs
- vegetable oil
- vanilla extract
- water
- butter, room temperature
- unsweetened cocoa powder
- vanilla
- powdered sugar
- whole milk, divided
- Preheat the oven to 350°F. The pan’s dimensions being specified are a nice touch: Line a 9×13-inch baking dish with parchment paper and reserve.
- Within the bowl of your stand mixer, affix the whisk attachment before combining the flour, sugar, cornstarch, cocoa powder, baking powder, baking soda, and salt in a single entity. Blend the mixture on a low speed setting until all the ingredients are fully incorporated.
- With the mixer operating at a low speed, gradually incorporate the eggs, oil, vanilla extract, and water into the mixture. Mix on medium-low until smooth. The batter will be thin.
- Bake in the prepared pan for 40-45 minutes, or until a toothpick inserted into the centre emerges clean.
- Permit the cake to reach a complete cooling state within the pan.
- As the cake cools, concurrently prepare the frosting by blending together the butter, cocoa powder, vanilla extract, powdered sugar, and three-quarters of milk within the bowl of a stand mixer, which has been equipped with the paddle attachment. Combine the ingredients at a low speed, allowing them to meld together before gradually elevating the mixing tempo to medium. Beat the frosting for exactly two minutes, ensuring a smooth and pale hue develops through consistent mixing.
- Set aside approximately 2.5 cups of frosting for the cake’s final covering.
- Once the cake has thoroughly cooled, carefully invert it from the cake pan onto a generously lined counter with parchment paper.
- Divide the cake into two equal portions by carefully cutting across it with a serrated knife, resulting in two distinct layers. With deliberate precision, gently grasp the uppermost tier of the cake between your thumb and index finger on each hand and slowly pivot them to guide it onto a awaiting serving platter. Smoothly spread the generous helping of rich, velvety unreserved fudge frosting evenly across this moist and decadent cake layer.
- Gently place the remaining cake half atop the frosted layer, ensuring a seamless union.
- With the remaining 1/4 cup of milk, we’ll gently whisk together two cups of the reserved frosting to achieve a smooth and creamy consistency. Ensure a uniform coating by applying the frosting to the cake in smooth, even layers.
- With the remaining half-cup of frosting, fill either a piping bag or a zip-top bag with its corner carefully cut off, then create whimsical swirls atop the cake, evoking the iconic charm of Little Debbie’s signature treat.