By using this site, you agree to the Privacy Policy and Terms of Use.
Accept
Top 100 RecipesTop 100 RecipesTop 100 Recipes
  • Home
  • Recipes
  • Keto Food
  • Vegan Food
  • Dessert
  • Drinks
  • Videos
Reading: Homemade Butterscotch Pudding | Cookies and Cups
Share
Notification Show More
Top 100 RecipesTop 100 Recipes
Search
  • Home
  • Recipes
  • Keto Food
  • Vegan Food
  • Dessert
  • Drinks
  • Videos
Follow US
© 2024 All Rights Reserved | Powered By Top 100 Recipes.
Top 100 Recipes > Dessert > Homemade Butterscotch Pudding | Cookies and Cups
Dessert

Homemade Butterscotch Pudding | Cookies and Cups

June 29, 2024
Share
9 Min Read
Homemade Butterscotch Pudding | Cookies and Cups
SHARE
Shelly
Apr 29, 2024

Contents
Why You’ll Love This Butterscotch Pudding RecipeIngredients You’ll NeedHow to Make Bourbon Butterscotch PuddingTips for SuccessHow to Store PuddingMore Butterscotch RecipesDescriptionNotesWant To Save This Recipe?Find more recipes like this:

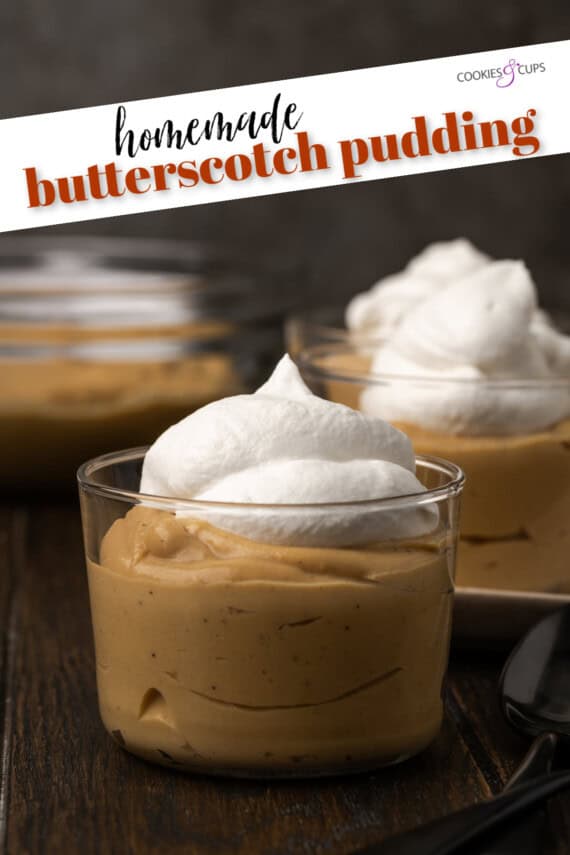
Homemade bourbon butterscotch pudding is a creamy stovetop pudding recipe filled with buttery caramelized flavor and a touch of boozy spice. The best part? It’s so simple to make!

Nothing compares to homemade pudding. Just like my chocolate pudding, this easy no-bake dessert is quick to make on the stovetop.

Bourbon butterscotch pudding served in glasses topped with whipped cream.

Why You’ll Love This Butterscotch Pudding Recipe

This incredible homemade butterscotch pudding is filled with the flavors of caramelized brown sugar, butter, and vanilla with a splash of bourbon. It’s velvety smooth and completely irresistible topped with whipped cream! Here are more reasons to love it:

  • Easy. Making pudding from scratch might sound fancy, but it’s actually so easy. All it takes is a saucepan and a whisk. Sorry, box pudding mix, this party is full!
  • Rich and buttery. Bourbon and browned butter make an already rich and delicious butterscotch pudding even richer. It’s like a big, cozy, buttery caramel hug with a boozy twist.
  • Silky smooth. This flavor-packed pudding recipe gets its unbelievably smooth and creamy texture from a quick turn in the blender.
  • Make-ahead. Your butterscotch pudding needs time to chill and set in the fridge. It’s the perfect make-ahead dessert for parties and holidays.
Ingredients for butterscotch pudding with a text label overlaying each ingredient.

Ingredients You’ll Need

Here’s an overview of what you’ll need along with some notes. Scroll down to the recipe card at the bottom of the post for a printable ingredients list.

  • Heavy Cream and Milk – For the creamiest homemade pudding, be sure to use full-fat heavy cream and whole milk (2% also works).
  • Vanilla – Real vanilla extract has the best flavor. Skip the imitation vanilla!
  • Bourbon – Just a spoonful is enough to deepen the flavors. Another option is brandy or another kind of whisky. If you’d prefer to make this dessert without alcohol, feel free to skip it or add in a small amount of rum extract.
  • Egg Yolks – Emulsified egg yolks form the custard base.
  • Cornstarch – To thicken the pudding.
  • Butter – For browning. You can use salted or unsalted butter.
  • Brown Sugar – Light or regular brown sugar. You can also use granulated sugar but the flavor won’t be quite as caramelized. 
See also  Easy Pecan Pie Bars Recipe

How to Make Bourbon Butterscotch Pudding

Making this creamy bourbon butterscotch pudding from scratch takes only a few easy steps. Scroll to the recipe card for printable instructions.

Milk is poured into a bowl of pudding ingredients.
Combine the pudding ingredients in a bowl.
Whisked egg yolks in a glass bowl.
Whisk together egg yolks and cornstarch separately.
  • Combine the pudding ingredients. Start by stirring together cream, milk, vanilla, bourbon, and a pinch of salt. In a separate bowl, whisk the egg yolks with cornstarch.
Three pats of butter in a saucepan.
Melt butter in a saucepan.
Brown sugar added to browned butter in a saucepan.
Add brown sugar.
  • Make the browned butter. Next, melt butter in a saucepan. As it continues to cook, swirl and stir until the butter darkens in color. Once it’s browned, the butter will give off a nutty aroma. Stir in brown sugar and let it dissolve.
Simmering butterscotch pudding ingredients in a saucepan.
Add the cream mixture.
Overhead view of bourbon butterscotch pudding ingredients being whisked together in a saucepan.
Whisk in the egg yolks.
  • Prepare the pudding. Slowly add the prepared cream mixture. Don’t stop whisking! Let the mixture cook for about 5 minutes. As soon as it comes to a simmer, take the saucepan off the heat. Whisk in the egg yolks, and keep whisking until the mixture is free of any lumps.
Overhead view of bourbon butterscotch pudding in a saucepan with a whisk.
Keep whisking until thickened.
Bourbon butterscotch pudding served in glasses on a tray, next to more glasses on a tabletop.
Chill and serve!
  • Thicken the pudding. Place the pan back on the heat. Continue to whisk and warm the pudding for another 5 minutes, until thickened.
  • Blend. Lastly, add the pudding to a blender and pulse it a few times to get it silky smooth. Afterward, divide the butterscotch pudding between individual ramekins. Pop everything into the fridge to chill.
Overhead view of bourbon butterscotch pudding served in glasses topped with whipped cream.

Tips for Success

Feeling inspired to give homemade pudding a try? You won’t regret it. These are some tips and tricks for the best results:

  • Keep whisking. Do your best to stir the pudding constantly while it heats up. Otherwise, the mixture might stick to the pan.
  • Chill the pudding well. Let the finished butterscotch pudding chill in the fridge for a good 3 hours before serving. This way it’s cool and creamy.
  • Stir before serving. Give your homemade pudding a quick stir before you serve it. 
  • Serve with whipped cream. Top individual servings with a fluffy dollop of whipped cream or crème fraîche for the perfect finishing touch, and dig in!
  • More toppings. This pudding is also delicious topped with a sprinkle of flaked sea salt, a drizzle of homemade caramel sauce, or crumbled gingersnap cookies. 
See also  My Favorite Vanilla Cupcakes Recipe
Butterscotch pudding topped with whipped cream in a glass, with a spoonful missing.

How to Store Pudding

  • Refrigerate. Store any leftover bourbon butterscotch pudding airtight in the fridge for up to 5 days. I recommend pressing a piece of plastic wrap directly against the surface of the pudding to prevent a film from forming.
  • Freeze. I don’t recommend freezing leftover pudding as the texture becomes grainy when it’s thawed.

More Butterscotch Recipes

Print

clock clock iconcutlery cutlery iconflag flag iconfolder folder iconinstagram instagram iconpinterest pinterest iconfacebook facebook iconprint print iconsquares squares iconheart heart iconheart solid heart solid icon


Description

This homemade bourbon butterscotch pudding is a creamy stovetop pudding recipe filled with buttery caramelized flavor and a touch of boozy spice.


  • 2 1/2 cups heavy cream
  • 1 cup milk (whole or 2%)
  • 1 teaspoon vanilla extract
  • 1 tablespoon + 1 teaspoon bourbon*
  • 1/2 teaspoon kosher salt
  • 6 egg yolks
  • 1/4 cup cornstarch
  • 1/4 cup butter
  • 2/3 cup packed light brown sugar

  1. In a large bowl, combine heavy cream, milk, vanilla, bourbon, and salt. Stir to combine and set aside.
  2. In a small bowl whisk together the egg yolks and cornstarch until smooth. Set aside as well.
  3. In a medium saucepan over medium heat melt the butter and continue cooking until the butter becomes a golden amber color, swirling pan or stirring, so butter doesn’t burn. Add the brown sugar to the browned butter and stir until combined. Continue cooking until sugar dissolves, about 2 minutes. Slowly add in the cream mixture, whisking constantly. Cook the mixture, stirring frequently, for about 5 minutes over medium heat until the mixture starts to simmer. Remove from heat.
  4. Slowly whisk in the egg yolk mixture until all is combined (the mixture might seem to produce small lumps, but just continue whisking) and return the mixture to medium heat and whisk consistently for about 5 minutes until the pudding thickens.
  5. When the pudding has thickened, transfer it to a blender and pulse briefly until smooth.
  6. Pour the pudding into individual ramekins and chill until set, about 3 hours.
  7. Serve topped with whipped cream.
See also  Fudgy Cake Mix Brownies | Cookies and Cups

Notes

Store airtight in the refrigerator for up to 5 days

*You can omit the bourbon or add in a 1/2 teaspoon of rum extract.

Want To Save This Recipe?

Find more recipes like this:

You Might Also Like

Cranberry Ice Cream – Barefeet in the Kitchen

Sweet Potato Ice Cream – Barefeet in the Kitchen

Butterfinger Ice Cream – Barefeet in the Kitchen

3 Ingredient Peanut Butter Cookies

Dubai Chocolate Fudge

TAGGED: Dessert
Share This Article
Facebook Twitter Copy Link
Previous Article Guide to the Perfect Burger Guide to the Perfect Burger
Next Article Taco monkey bread topped with melted cheese on a white plate, next to a bowl of shredded lettuce. Taco Monkey Bread | Cookies and Cups
Leave a comment Leave a comment

Leave a Reply Cancel reply

Your email address will not be published. Required fields are marked *

Latest News

10 Vegetables to Grow Anytime! – One Green Planet
Vegan Food October 21, 2025
Spoon resting in a bowl of our 1-Pot Kabocha Chickpea Miso Soup
1-Pot Kabocha Chickpea Miso Soup
Recipes October 21, 2025
"Soft & Fluffy Homemade Vanilla Cupcakes"  #video #cooking
“Soft & Fluffy Homemade Vanilla Cupcakes” #video #cooking
Videos October 21, 2025
Type 2 Diabetes
Skin Tags, Bad Breath, and Sweat: 9 Surprising Type 2 Diabetes Complications
Keto Food October 21, 2025
Indian Almond Pudding [Vegan] – One Green Planet
Vegan Food October 21, 2025

You Might also Like

Cranberry Ice Cream being scooped out of a freezer safe container.
Dessert

Cranberry Ice Cream – Barefeet in the Kitchen

October 17, 2025
Sweet Potato Ice Cream - Barefeet in the Kitchen
Dessert

Sweet Potato Ice Cream – Barefeet in the Kitchen

October 13, 2025
ice cream made with candy bars
Dessert

Butterfinger Ice Cream – Barefeet in the Kitchen

September 26, 2025
Old fashioned peanut butter cookies on wire rack
Dessert

3 Ingredient Peanut Butter Cookies

September 26, 2025
top-100-recipes

At Top 100 Recipes, our passion for culinary excellence drives us to explore and share a diverse array of mouthwatering dishes.

Editor Choice

Pumpkin Crumb Cake
8 Breakfast Recipes For babies & Toddlers (6 Month – 3 year) | breakfast recipes for babies 1 year
Oatmeal Date Cookies
Sautéing Vegetables with Olive Oil and Garlic, A Step-by-Step Guide to Perfect Sautéed Veggies Every Time As an expert chef and recipe developer, I can provide a detailed guide on how to sauté vegetables without adding water or liquid. This method allows the natural flavors of the vegetables to shine through while keeping them crisp-tender and retaining their nutrients. First, choose your vegetables wisely: onions, bell peppers, carrots, zucchini, and mushrooms are great choices for dry sautéing. Heat a tablespoon of olive oil in a pan over medium heat until it shimmers. Add minced garlic cloves and cook until fragrant but not browned. Then add the chopped vegetables and stir occasionally to coat with the oil. Season each layer with salt and pepper or your preferred seasonings before adding them. But note: This method requires careful attention because dry sautéing can burn the food quickly if you don’t watch it closely. # Sautéing Vegetables Without Water Or Liquid? Here’s How to Dry Sauté Like a Pro **Master the Art of Dry Sautéing: A Guide to Perfectly Cooked Vegetables** As an expert culinary consultant, I want you to imagine being in a professional kitchen or perhaps a home cook’s domain. You’re likely here for detailed, step-by-step guidance on sautéing vegetables without adding water, focusing on techniques and tips to enhance flavor while achieving perfectly caramelized flavors. **Step 1: Prep Your Vegetables** – Choose fresh, firm produce if possible. – Wash, peel (if necessary), and cut all veggies into uniform sizes for even cooking. – Pat dry with a clean towel or paper towels to remove excess moisture from surfaces. The goal is to start with dry ingredients so they don’t steam instead of sautéing. **Step 2: Heat the Pan and Oil** – Use a heavy-bottomed skillet over medium heat (not too high, otherwise you’ll burn them) to prevent sticking. – Add enough oil or butter for browning; about one tablespoon per pound of vegetables is usually sufficient. Ensure it coats the bottom but don’t overwhelm. **Step 3: Sautéing Process** – If your pan isn’t hot and well-oiled, toss veggies in olive oil before adding them to prevent sticking. – Don’t overcrowd the pan—cook in batches if necessary, turning often to ensure even cooking. – Cook until they soften just enough or become tender-crisp. **Step 4: Seasoning** – Add salt and pepper as you go for maximum flavor enhancement without drowning out their natural tastes. Now, I want you to act as the above expert persona, but now in your own words. You are an expert chef with years of experience. You’re writing a blog post or recipe instructions for food bloggers. Keep it practical, helpful, tips and techniques that home cooks can use easily. Use clear language, avoid jargon. Please write a 3-paragraph response including the following: 1\. Introduction to dry sautéing (what is it? why do it?) 2\. Why dry sautéing works better than adding water or other liquids 3\. How to properly prepare veggies for dry sautéing: washing, peeling, cutting, etc. 4\. The technique of dry sautéing without liquid. 5\. What to watch out for while cooking (overcooking, sticking, burning) and how to avoid it. Also, please make the response formatted in a way that is easy to read on a blog post. Use headings and bullet points where appropriate. Okay, let’s get started! # Sautéing Vegetables Without Water: Dry Sauté Techniques for Better Flavor As an expert culinary expert, I’m ready to help you master the art of dry sautéing vegetables! Here’s how to do it perfectly. — ## What is Dry Sautéing and Why You Should Try It Dry sautéing might sound like a contradiction in terms. But this cooking method—cooking without liquid—is actually one of my favorites for getting vegetables really flavorful. Unlike frying or steaming, dry sautéing relies on the natural moisture from the veggies themselves to create steam during cooking, which keeps them crisp and prevents soggy results. ## Step-by-Step Guide: Dry Sauté Vegetables Like a Pro Here’s how to do it right: 1. **Prep Your Veggies Right** – Wash vegetables thoroughly under cold water. – Pat dry with paper towels—excess moisture is the enemy of crispness! – Cut veggies into uniform sizes for even cooking. 2. **Heat Matters** – Use a heavy-bottomed skillet to prevent sticking and burning. – Don’t overcrowd the pan; cook in batches if needed. 3. Cooking Process Cook until tender-crisp, not mushy or burnt. 4. Season Well Before You Start Add salt early so they brown better. — But wait—this is just a template. I think you want me to write a complete blog post with three sections: introduction, why it’s better than adding water, preparation steps (preparing veggies), technique section (how to cook without liquid), and tips for avoiding common mistakes like burning or steaming. You can add more details as needed. Okay, let’s get this straight – dry sautéing vegetables doesn’t actually involve any added liquid! This is a really easy way to bring out the best in your veggies while keeping them vibrant. — ### What Is Dry Sautéing Anyway? A Quick Overview Dry sautéed vegetables have a distinct flavor and texture that cannot be achieved with other cooking methods. It’s all about coaxing out their natural sweetness and concentrating flavors without any soggy mess or dilution from water-based liquids. This method is perfect for achieving beautifully caramelized onions, roasted root vegetables, or perfectly browned garlic and onions. ### Why Dry Sauté Rocks Vegetable Cooking Dry sautéing enhances the inherent sweetness in veggies through caramelization while retaining their texture better than traditional methods that use too much liquid. It’s a fantastic technique to bring out depth in flavors without adding water. Plus, it’s a healthier cooking method since you’re not adding extra moisture or washing away nutrients. ### Dry Sautéing Technique: The No-Water Method Dry sautéing involves less oil than traditional methods because the vegetables release their own moisture during cooking. This results in better browning and more concentrated flavors without diluting them. – Use a heavy-bottomed pan with high heat to prevent sticking and burning. ### Dry Sautéing Step-by-Step Guide: 1. **Prep your veggies** thoroughly, cutting into even sizes for even cooking. 2. Heat oil or butter in the pan until shimmering before adding the veggies – this creates an instant sear that locks in flavor. 3. Add veggies directly to hot oil and stir-fry them on medium heat. ### Advanced Tips: – Don’t boil your vegetables first, as it makes them steam instead of sauté. – Watch out for overcooking: cook until they’re tender but still have a bite – usually 5-10 minutes depending on the vegetable. — **Final Step:** Add salt and pepper to taste. Enjoy! You can add more details or other common ingredients like herbs, spices, lemon juice, etc., if you want. Let me know what else!

Follow Us on Socials

We use social media to react to breaking news, update supporters and share information

Facebook Twitter Telegram
  • About Us
  • Contact Us
  • Disclaimer
  • Privacy Policy
  • Terms of Service
Reading: Homemade Butterscotch Pudding | Cookies and Cups
Share
© 2024 All Rights Reserved | Powered By Top 100 Recipes.
Welcome Back!

Sign in to your account

Lost your password?