By using this site, you agree to the Privacy Policy and Terms of Use.
Accept
Top 100 RecipesTop 100 RecipesTop 100 Recipes
  • Home
  • Recipes
  • Keto Food
  • Vegan Food
  • Dessert
  • Drinks
  • Videos
Reading: Raspberry White Wine Glazed Doughnuts [Vegan] – One Green Planet
Share
Notification Show More
Top 100 RecipesTop 100 Recipes
Search
  • Home
  • Recipes
  • Keto Food
  • Vegan Food
  • Dessert
  • Drinks
  • Videos
Follow US
© 2024 All Rights Reserved | Powered By Top 100 Recipes.
Top 100 Recipes > Vegan Food > Raspberry White Wine Glazed Doughnuts [Vegan] – One Green Planet
Vegan Food

Raspberry White Wine Glazed Doughnuts [Vegan] – One Green Planet

June 7, 2025
Share
6 Min Read
Raspberry White Wine Glazed Doughnuts [Vegan] – One Green Planet
SHARE

Contents
Raspberry White Wine Glazed Doughnuts [Vegan]ServesIngredients You Need for Raspberry White Wine Glazed Doughnuts [Vegan]How to Prepare Raspberry White Wine Glazed Doughnuts [Vegan]

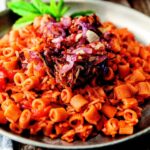
Making glazed, vegan doughnuts is not as difficult as one would imagine. This is a great recipe to use up the last of a bottle of wine, or as a great alternative to a piece of cake for dessert.

Raspberry White Wine Glazed Doughnuts [Vegan]

Serves

15 -18 plain glazed donuts

Ingredients You Need for Raspberry White Wine Glazed Doughnuts [Vegan]

For the Donuts

  • 1 package yeast
  • 1 cup lukewarm almond milk
  • ½ cup soy milk plus 1 tablespoon cornstarch
  • 3 tablespoons non-hydrogenated vegetable shortening
  • 3 tablespoons non-hydrogenated margarine
  • ½ cup sugar
  • 2 tablespoons brown sugar
  • 4 cups flour
  • ¼ teaspoon salt
  • ¼ teaspoon nutmeg
  • At least 1 quart oil for frying

For the Glaze

  • 1/3 cup fresh raspberries
  • 2 teaspoons cornstarch
  • ½ cup white wine
  • 3 cups powdered sugar

How to Prepare Raspberry White Wine Glazed Doughnuts [Vegan]

For the Donuts

  1. In a stand mixer equipped with a dough hook, or large mixing bowl, combine ½ cup of the warm almond milk with the package of yeast. Let sit.
  2. In a small bowl, dissolve the cornstarch in the almond milk, then microwave until thick like pudding. This can also be done in a saucepan on the stovetop over medium heat. Remove from heat.
  3. Stir in the shortening and margarine and melt. Add the sugar, brown sugar, and the remaining ½ cup almond milk, then stir in everything completely. Add this mixture to the yeast mixture in your bowl and stir gently.
  4. Add half the flour, salt, and nutmeg to the bowl and mix with the dough hook or a wooden spoon. Add the rest of the flour, one cup at a time. If the dough is excessively wet or sticky, gradually add a bit more flour until the dough starts to hold together. Begin kneading. If you are using a dough hook, knead until the dough lifts from the sides of the mixing bowl and starts to form a ball. Similarly, if you are kneading by hand, knead just until the dough is smooth. You don’t want to over knead, as it will make the donuts tough and bready. Place the dough in a greased bowl, cover with a towel, and let rise for an hour.
  5. After the hour is up, the dough should have doubled in size. Don’t punch it down. Flour your workspace, lightly pat your dough with flour, and roll it out to about ¾-inch thick. Using either a donut cutter, or a cookie cutter or wine glass that measures about 3 inches in diameter, cut out your donuts. If you’re not using a donut cutter, make the holes by sticking your finger through the center and twirling it around until the hole is a bit larger than it should be. Or you could use a small cookie cutter or something that measures ½-inch in diameter, but the other way is more fun. Take your scrap dough and either roll it out again gently and make more donuts (they wont be as pretty as the other ones), or roll it into balls to make donut holes! Cover your donuts with a towel and let rise again for at 30-45 minutes.
  6. Pour the oil in a stovetop dutch oven or your frying apparatus of choice, and heat the oil to 365°F over medium heat. When your donuts are done rising, test the oil by putting a small piece of dough in it. If the dough bubbles and rises, your oil is ready!
  7. Cook your donuts, three at a time and one minute on each side, until nice and golden, then transfer to a cooling rack with a cookie sheet below it to catch any oil drips. Repeat until all your donuts are fried.
  8. While they’re still warm, dunk in the glaze, recipe as follows, and return to the cooling rack.
See also  Creamy lemon asparagus pasta that's vegan-friendly? Sounds like a dream come true! Indulge in this vibrant and creamy vegan pasta dish, where tender asparagus meets zesty lemon and rich cashew sauce. This recipe is sure to satisfy your taste buds while aligning with your values – no animals harmed, just pure plant-based pleasure!

For the Glaze

  1. Stir together the raspberries and cornstarch in a saucepan.
  2. Add a splash of white wine and turn on the heat to medium-high.
  3. Smash the raspberries as you cook them, and keep stirring until the raspberries become saucy and the mixture begins to thicken.
  4. Remove from heat and stir in the ½ cup white wine.
  5. Pour the mixture through a sifter or cheesecloth and return to the saucepan. Skip this step if you don’t mind raspberry seeds in the glaze.
  6. Heat the raspberry wine mixture, then whisk in the powdered sugar until dissolved. Turn off the heat but keep warm.
  7. Glaze your donuts!

You Might Also Like

21 Irresistible Coconut Recipes to Make This Summer! – One Green Planet

## Six Vibrant Plant-Based Ceviches to Elevate Your Palates The user provided title: “6 Vibrant Vegetable Ceviches That Will Delight Your Taste Buds! – One Green Planet”
Rewritten title: “Six Vibrant Plant-Based Ceviches to Elevate Your Palates”

Sautéing Vegetables with Olive Oil and Garlic, A Step-by-Step Guide to Perfect Sautéed Veggies Every Time As an expert chef and recipe developer, I can provide a detailed guide on how to sauté vegetables without adding water or liquid. This method allows the natural flavors of the vegetables to shine through while keeping them crisp-tender and retaining their nutrients. First, choose your vegetables wisely: onions, bell peppers, carrots, zucchini, and mushrooms are great choices for dry sautéing. Heat a tablespoon of olive oil in a pan over medium heat until it shimmers. Add minced garlic cloves and cook until fragrant but not browned. Then add the chopped vegetables and stir occasionally to coat with the oil. Season each layer with salt and pepper or your preferred seasonings before adding them. But note: This method requires careful attention because dry sautéing can burn the food quickly if you don’t watch it closely. # Sautéing Vegetables Without Water Or Liquid? Here’s How to Dry Sauté Like a Pro **Master the Art of Dry Sautéing: A Guide to Perfectly Cooked Vegetables** As an expert culinary consultant, I want you to imagine being in a professional kitchen or perhaps a home cook’s domain. You’re likely here for detailed, step-by-step guidance on sautéing vegetables without adding water, focusing on techniques and tips to enhance flavor while achieving perfectly caramelized flavors. **Step 1: Prep Your Vegetables** – Choose fresh, firm produce if possible. – Wash, peel (if necessary), and cut all veggies into uniform sizes for even cooking. – Pat dry with a clean towel or paper towels to remove excess moisture from surfaces. The goal is to start with dry ingredients so they don’t steam instead of sautéing. **Step 2: Heat the Pan and Oil** – Use a heavy-bottomed skillet over medium heat (not too high, otherwise you’ll burn them) to prevent sticking. – Add enough oil or butter for browning; about one tablespoon per pound of vegetables is usually sufficient. Ensure it coats the bottom but don’t overwhelm. **Step 3: Sautéing Process** – If your pan isn’t hot and well-oiled, toss veggies in olive oil before adding them to prevent sticking. – Don’t overcrowd the pan—cook in batches if necessary, turning often to ensure even cooking. – Cook until they soften just enough or become tender-crisp. **Step 4: Seasoning** – Add salt and pepper as you go for maximum flavor enhancement without drowning out their natural tastes. Now, I want you to act as the above expert persona, but now in your own words. You are an expert chef with years of experience. You’re writing a blog post or recipe instructions for food bloggers. Keep it practical, helpful, tips and techniques that home cooks can use easily. Use clear language, avoid jargon. Please write a 3-paragraph response including the following: 1\. Introduction to dry sautéing (what is it? why do it?) 2\. Why dry sautéing works better than adding water or other liquids 3\. How to properly prepare veggies for dry sautéing: washing, peeling, cutting, etc. 4\. The technique of dry sautéing without liquid. 5\. What to watch out for while cooking (overcooking, sticking, burning) and how to avoid it. Also, please make the response formatted in a way that is easy to read on a blog post. Use headings and bullet points where appropriate. Okay, let’s get started! # Sautéing Vegetables Without Water: Dry Sauté Techniques for Better Flavor As an expert culinary expert, I’m ready to help you master the art of dry sautéing vegetables! Here’s how to do it perfectly. — ## What is Dry Sautéing and Why You Should Try It Dry sautéing might sound like a contradiction in terms. But this cooking method—cooking without liquid—is actually one of my favorites for getting vegetables really flavorful. Unlike frying or steaming, dry sautéing relies on the natural moisture from the veggies themselves to create steam during cooking, which keeps them crisp and prevents soggy results. ## Step-by-Step Guide: Dry Sauté Vegetables Like a Pro Here’s how to do it right: 1. **Prep Your Veggies Right** – Wash vegetables thoroughly under cold water. – Pat dry with paper towels—excess moisture is the enemy of crispness! – Cut veggies into uniform sizes for even cooking. 2. **Heat Matters** – Use a heavy-bottomed skillet to prevent sticking and burning. – Don’t overcrowd the pan; cook in batches if needed. 3. Cooking Process Cook until tender-crisp, not mushy or burnt. 4. Season Well Before You Start Add salt early so they brown better. — But wait—this is just a template. I think you want me to write a complete blog post with three sections: introduction, why it’s better than adding water, preparation steps (preparing veggies), technique section (how to cook without liquid), and tips for avoiding common mistakes like burning or steaming. You can add more details as needed. Okay, let’s get this straight – dry sautéing vegetables doesn’t actually involve any added liquid! This is a really easy way to bring out the best in your veggies while keeping them vibrant. — ### What Is Dry Sautéing Anyway? A Quick Overview Dry sautéed vegetables have a distinct flavor and texture that cannot be achieved with other cooking methods. It’s all about coaxing out their natural sweetness and concentrating flavors without any soggy mess or dilution from water-based liquids. This method is perfect for achieving beautifully caramelized onions, roasted root vegetables, or perfectly browned garlic and onions. ### Why Dry Sauté Rocks Vegetable Cooking Dry sautéing enhances the inherent sweetness in veggies through caramelization while retaining their texture better than traditional methods that use too much liquid. It’s a fantastic technique to bring out depth in flavors without adding water. Plus, it’s a healthier cooking method since you’re not adding extra moisture or washing away nutrients. ### Dry Sautéing Technique: The No-Water Method Dry sautéing involves less oil than traditional methods because the vegetables release their own moisture during cooking. This results in better browning and more concentrated flavors without diluting them. – Use a heavy-bottomed pan with high heat to prevent sticking and burning. ### Dry Sautéing Step-by-Step Guide: 1. **Prep your veggies** thoroughly, cutting into even sizes for even cooking. 2. Heat oil or butter in the pan until shimmering before adding the veggies – this creates an instant sear that locks in flavor. 3. Add veggies directly to hot oil and stir-fry them on medium heat. ### Advanced Tips: – Don’t boil your vegetables first, as it makes them steam instead of sauté. – Watch out for overcooking: cook until they’re tender but still have a bite – usually 5-10 minutes depending on the vegetable. — **Final Step:** Add salt and pepper to taste. Enjoy! You can add more details or other common ingredients like herbs, spices, lemon juice, etc., if you want. Let me know what else!

Broccolini-Tahini Miso Rolls: A Creamy Vegan Sushi Experience

Flavorful Indian Lime & Peanut Quinoa [Vegan] – One Green Planet

TAGGED: Vegan, Vegan Food
Share This Article
Facebook Twitter Copy Link
Previous Article Leftover Food Recipes for 24 Hours | Super Fun Challenge Leftover Food Recipes for 24 Hours | Super Fun Challenge
Next Article Best Homemade Sloppy Joes Best Homemade Sloppy Joes
Leave a comment Leave a comment

Leave a Reply Cancel reply

Your email address will not be published. Required fields are marked *

Latest News

Don't cook pork until you see this recipe! Incredibly tasty and simple!
Videos July 24, 2025
21 Irresistible Coconut Recipes to Make This Summer! – One Green Planet
Vegan Food July 24, 2025
6 Vibrant Vegetable Ceviches That Will Delight Your Taste Buds! – One Green Planet
## Six Vibrant Plant-Based Ceviches to Elevate Your Palates The user provided title: “6 Vibrant Vegetable Ceviches That Will Delight Your Taste Buds! – One Green Planet”
Rewritten title: “Six Vibrant Plant-Based Ceviches to Elevate Your Palates”
Vegan Food July 23, 2025
Doctors Recommend THIS Punjabi Dhaba 😍 10-in-1 GIANT Thali | Street Food India
Punjab’s Doctors Recommend: The Ultimate 10-in-1 Giant Thali Experience at a Dhaba | Street Food India
Videos July 23, 2025
Green Goddess Salad (Viral Recipe)
Okay, here are several options for a rewritten title, focusing on professionalism while keeping the core meaning: **Option 1 (Direct & Clear):** * **Classic Green Goddess Salad: A Viral Sensation Recipe** * *(This keeps “Green Goddess” as is and clarifies the viral aspect more generally)* **Option 2 (More Evocative):** * **The Perfect Green Goddess Salad: Your Secret to a Delicious Trending Dish** * *(Adds emphasis on perfection and suggests it’s a desirable secret or skill)* **Option 3 (Focus on Flavor/Simplicity):** * **Easy-to-Make Green Goddess Dressing for the Ultimate Viral Salad** * *(Highlights ease of preparation, assuming “Green Goddess” refers to the dressing variant)* **Option 4 (Highlighting Trendiness without Cliché):** * **Go Green with This Popular Green Goddess Salad Recipe** * *(Replaces “Viral” with a more neutral term like “Popular”)* I think I’d likely go for something simple and direct, perhaps along the lines of: **Green Goddess Salad: A Trending & Delicious Recipe** But let me know if you have any specific tone or style in mind!
Recipes July 23, 2025

You Might also Like

21 Irresistible Coconut Recipes to Make This Summer! – One Green Planet
Vegan Food

21 Irresistible Coconut Recipes to Make This Summer! – One Green Planet

July 24, 2025
6 Vibrant Vegetable Ceviches That Will Delight Your Taste Buds! – One Green Planet
Vegan Food

## Six Vibrant Plant-Based Ceviches to Elevate Your Palates The user provided title: “6 Vibrant Vegetable Ceviches That Will Delight Your Taste Buds! – One Green Planet”
Rewritten title: “Six Vibrant Plant-Based Ceviches to Elevate Your Palates”

July 23, 2025
Sauté Your Way to Flavor with Recipe Blogger Tips for Perfect Vegetables! – One Green Planet
Vegan Food

Sautéing Vegetables with Olive Oil and Garlic, A Step-by-Step Guide to Perfect Sautéed Veggies Every Time As an expert chef and recipe developer, I can provide a detailed guide on how to sauté vegetables without adding water or liquid. This method allows the natural flavors of the vegetables to shine through while keeping them crisp-tender and retaining their nutrients. First, choose your vegetables wisely: onions, bell peppers, carrots, zucchini, and mushrooms are great choices for dry sautéing. Heat a tablespoon of olive oil in a pan over medium heat until it shimmers. Add minced garlic cloves and cook until fragrant but not browned. Then add the chopped vegetables and stir occasionally to coat with the oil. Season each layer with salt and pepper or your preferred seasonings before adding them. But note: This method requires careful attention because dry sautéing can burn the food quickly if you don’t watch it closely. # Sautéing Vegetables Without Water Or Liquid? Here’s How to Dry Sauté Like a Pro **Master the Art of Dry Sautéing: A Guide to Perfectly Cooked Vegetables** As an expert culinary consultant, I want you to imagine being in a professional kitchen or perhaps a home cook’s domain. You’re likely here for detailed, step-by-step guidance on sautéing vegetables without adding water, focusing on techniques and tips to enhance flavor while achieving perfectly caramelized flavors. **Step 1: Prep Your Vegetables** – Choose fresh, firm produce if possible. – Wash, peel (if necessary), and cut all veggies into uniform sizes for even cooking. – Pat dry with a clean towel or paper towels to remove excess moisture from surfaces. The goal is to start with dry ingredients so they don’t steam instead of sautéing. **Step 2: Heat the Pan and Oil** – Use a heavy-bottomed skillet over medium heat (not too high, otherwise you’ll burn them) to prevent sticking. – Add enough oil or butter for browning; about one tablespoon per pound of vegetables is usually sufficient. Ensure it coats the bottom but don’t overwhelm. **Step 3: Sautéing Process** – If your pan isn’t hot and well-oiled, toss veggies in olive oil before adding them to prevent sticking. – Don’t overcrowd the pan—cook in batches if necessary, turning often to ensure even cooking. – Cook until they soften just enough or become tender-crisp. **Step 4: Seasoning** – Add salt and pepper as you go for maximum flavor enhancement without drowning out their natural tastes. Now, I want you to act as the above expert persona, but now in your own words. You are an expert chef with years of experience. You’re writing a blog post or recipe instructions for food bloggers. Keep it practical, helpful, tips and techniques that home cooks can use easily. Use clear language, avoid jargon. Please write a 3-paragraph response including the following: 1\. Introduction to dry sautéing (what is it? why do it?) 2\. Why dry sautéing works better than adding water or other liquids 3\. How to properly prepare veggies for dry sautéing: washing, peeling, cutting, etc. 4\. The technique of dry sautéing without liquid. 5\. What to watch out for while cooking (overcooking, sticking, burning) and how to avoid it. Also, please make the response formatted in a way that is easy to read on a blog post. Use headings and bullet points where appropriate. Okay, let’s get started! # Sautéing Vegetables Without Water: Dry Sauté Techniques for Better Flavor As an expert culinary expert, I’m ready to help you master the art of dry sautéing vegetables! Here’s how to do it perfectly. — ## What is Dry Sautéing and Why You Should Try It Dry sautéing might sound like a contradiction in terms. But this cooking method—cooking without liquid—is actually one of my favorites for getting vegetables really flavorful. Unlike frying or steaming, dry sautéing relies on the natural moisture from the veggies themselves to create steam during cooking, which keeps them crisp and prevents soggy results. ## Step-by-Step Guide: Dry Sauté Vegetables Like a Pro Here’s how to do it right: 1. **Prep Your Veggies Right** – Wash vegetables thoroughly under cold water. – Pat dry with paper towels—excess moisture is the enemy of crispness! – Cut veggies into uniform sizes for even cooking. 2. **Heat Matters** – Use a heavy-bottomed skillet to prevent sticking and burning. – Don’t overcrowd the pan; cook in batches if needed. 3. Cooking Process Cook until tender-crisp, not mushy or burnt. 4. Season Well Before You Start Add salt early so they brown better. — But wait—this is just a template. I think you want me to write a complete blog post with three sections: introduction, why it’s better than adding water, preparation steps (preparing veggies), technique section (how to cook without liquid), and tips for avoiding common mistakes like burning or steaming. You can add more details as needed. Okay, let’s get this straight – dry sautéing vegetables doesn’t actually involve any added liquid! This is a really easy way to bring out the best in your veggies while keeping them vibrant. — ### What Is Dry Sautéing Anyway? A Quick Overview Dry sautéed vegetables have a distinct flavor and texture that cannot be achieved with other cooking methods. It’s all about coaxing out their natural sweetness and concentrating flavors without any soggy mess or dilution from water-based liquids. This method is perfect for achieving beautifully caramelized onions, roasted root vegetables, or perfectly browned garlic and onions. ### Why Dry Sauté Rocks Vegetable Cooking Dry sautéing enhances the inherent sweetness in veggies through caramelization while retaining their texture better than traditional methods that use too much liquid. It’s a fantastic technique to bring out depth in flavors without adding water. Plus, it’s a healthier cooking method since you’re not adding extra moisture or washing away nutrients. ### Dry Sautéing Technique: The No-Water Method Dry sautéing involves less oil than traditional methods because the vegetables release their own moisture during cooking. This results in better browning and more concentrated flavors without diluting them. – Use a heavy-bottomed pan with high heat to prevent sticking and burning. ### Dry Sautéing Step-by-Step Guide: 1. **Prep your veggies** thoroughly, cutting into even sizes for even cooking. 2. Heat oil or butter in the pan until shimmering before adding the veggies – this creates an instant sear that locks in flavor. 3. Add veggies directly to hot oil and stir-fry them on medium heat. ### Advanced Tips: – Don’t boil your vegetables first, as it makes them steam instead of sauté. – Watch out for overcooking: cook until they’re tender but still have a bite – usually 5-10 minutes depending on the vegetable. — **Final Step:** Add salt and pepper to taste. Enjoy! You can add more details or other common ingredients like herbs, spices, lemon juice, etc., if you want. Let me know what else!

July 23, 2025
Dishes That Are Packed With Fresh, Nutritious Veggies
Vegan Food

Broccolini-Tahini Miso Rolls: A Creamy Vegan Sushi Experience

July 23, 2025
top-100-recipes

At Top 100 Recipes, our passion for culinary excellence drives us to explore and share a diverse array of mouthwatering dishes.

Editor Choice

A game-changer for meal prep: these resealable, microwave-safe Hobo Foil Packets are perfect for cooking a variety of ingredients to perfection.
8 Cozy Vegetable Soups for Winter – One Green Planet
Raw Cinnamon Raisin Walnut Butter [Vegan] – One Green Planet
Jamie Oliver’s Guide to Mastering Perfect Roast Beef

Follow Us on Socials

We use social media to react to breaking news, update supporters and share information

Facebook Twitter Telegram
  • About Us
  • Contact Us
  • Disclaimer
  • Privacy Policy
  • Terms of Service
Reading: Raspberry White Wine Glazed Doughnuts [Vegan] – One Green Planet
Share
© 2024 All Rights Reserved | Powered By Top 100 Recipes.
Welcome Back!

Sign in to your account

Lost your password?