By using this site, you agree to the Privacy Policy and Terms of Use.
Accept
Top 100 RecipesTop 100 RecipesTop 100 Recipes
  • Home
  • Recipes
  • Keto Food
  • Vegan Food
  • Dessert
  • Drinks
  • Videos
Reading: Snickers Salad Protein Bowl
Share
Notification Show More
Top 100 RecipesTop 100 Recipes
Search
  • Home
  • Recipes
  • Keto Food
  • Vegan Food
  • Dessert
  • Drinks
  • Videos
Follow US
© 2024 All Rights Reserved | Powered By Top 100 Recipes.
Top 100 Recipes > Recipes > Snickers Salad Protein Bowl
Recipes

Snickers Salad Protein Bowl

May 16, 2025
Share
8 Min Read
A snickers salad protein bowl topped with apple chunks, a chopped protein bar and a drizzle of peanut butter.
SHARE

This reimagined treat combines the timeless trio of apples, peanut butter, and chocolate in a nutritious way. With a whopping 35 grams of protein, this product makes an ideal high-protein breakfast or mid-day snack option.

Contents
Why You’ll Love This BowlIngredients NeededEasy Recipe Substitutions + VariationsAre you craving that sweet and savory combination in your snack game? Then you’ve come to the right place! To make this indulgent Snickers salad protein bowl, you’ll need: 1 cup cooked chicken breast, 1/2 cup Greek yogurt, 1 tablespoon almond butter, 1 tablespoon honey, 1/4 teaspoon vanilla extract, 1/2 cup mixed greens, 1/2 cup diced pineapple, 1/2 cup diced apple, 1/4 cup chopped pecans, and of course, 1/4 cup crushed Snickers bars. First, combine the chicken breast, Greek yogurt, almond butter, honey, and vanilla extract in a bowl. Mix until smooth! Then, add your mixed greens, pineapple, apple, and pecans to the top. Finally, sprinkle those crunchy Snickers bits on top for that ultimate indulgence. Enjoy your protein-packed treat!Brittany’s Tips!How to StoreFrequently Asked QuestionsMore High-Protein Breakfast Recipes

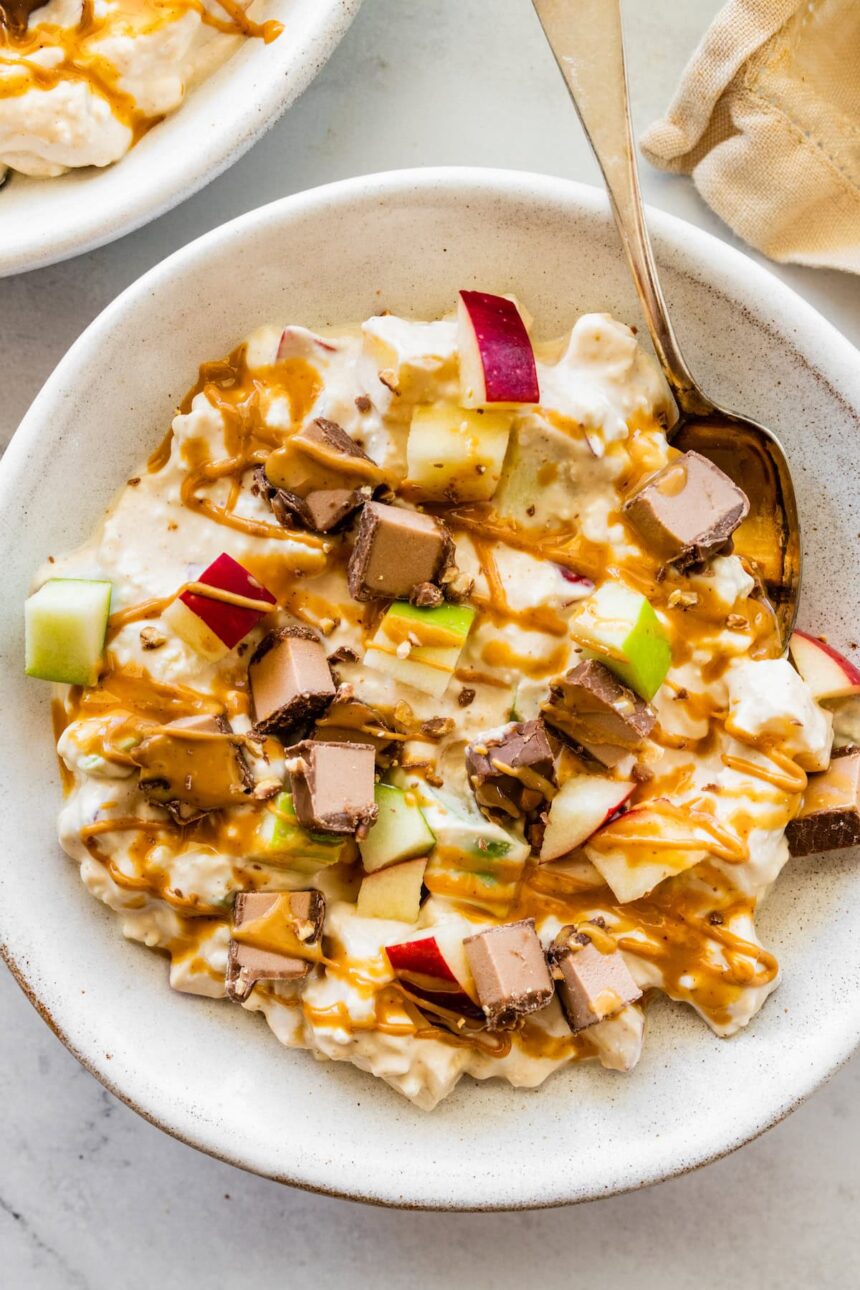
Here’s a sweet twist on a nostalgic treat: a lighter take on the classic Snickers salad that combines creamy textures and flavors of childhood memories.

Rich in flavors reminiscent of peanut butter, chocolate, and cream, this indulgent treat now boasts an added layer of nutrition, featuring wholesome ingredients that spark pride and satisfaction.

This version combines Greek yogurt and cottage cheese (similar to my popular PB&J protein yogurt bowl) with apples, peanut butter powder, and a chopped Barebells protein bar for that candy bar crunch.

I’ve developed a habit of whipping up this bowl repeatedly as both a morning breakfast option and an indulgent after-dinner delight. You’re eager to get started, aren’t you?

Why You’ll Love This Bowl

Here: If you’re tempted by the notion of indulging in dessert for morning sustenance – yet crave a more harmonious fusion of flavors and textures – then this nutritious bowl is your perfect starting point? Here’s why I’m utterly captivated by this phenomenon:

  • Boasting an impressive 35 grams of protein, this snack is powered by the protein-rich combination of cottage cheese, yogurt, PB2, and a protein bar.
  • The harmonious blend of creamy peanut butter, rich chocolate, and crunchy apples genuinely captures the essence of a classic Snickers salad in every bite.
  • – Just stir and serve. Ready to grab and go in just under 5 minutes, ideal for hectic morning routines.
See also  Tex-Mex Rice and Beans - The Stay At Home Chef

Ingredients Needed

  • Using a 5.3 oz container of Siggi’s low-sugar vanilla yogurt provides a rich and creamy foundation for this bowl; feel free to substitute with your preferred yogurt variety. Be cautious of high sugar levels in certain vanilla yogurts.
  • Enhances the dish’s richness and contributes a significant protein quotient, thereby rendering the bowl more satisfyingly filling. I’m a big fan of Good Culture’s products, particularly their low-fat and full-fat yogurt options.
  • One crisp apple, diced into satisfying bites, is the secret to this iconic Snickers salad’s signature texture. You can also experiment with a mix of apples, combining sweet and tart varieties to find the perfect blend.
  • A powdered peanut butter substitute that delivers the indulgent flavour of peanut butter while boasting reduced calorie and fat content. For those with a peanut allergy, consider substituting powdered almond or cashew powder for the peanut butter.
  • This indulgent treat combines the iconic Snickers taste with an added protein kick, perfect for those seeking a satisfying snack. Why not try the Barebells Salty Peanut Protein Bar? Its flavor is impressively authentic.
  • with a flourish of precision. Elevates the dish’s overall complexity by harmoniously marrying each flavor component. Why not try substituting my date caramel sauce for the peanut butter – its sweet, sticky flavor would add a delightful twist to this classic combination!

Easy Recipe Substitutions + Variations

Are you willing to shake things up and find a way to make this idea thrive? Here’s a revised version in a more professional tone:

Explore these straightforward substitutions and engaging concepts to enhance your creative endeavors.

  • Here’s a revised version that captures the essence of your original text while presenting it in a clearer and more concise manner:
  • : Don’t have Barebells? Why not treat yourself to a rich and satisfying favorite chocolatey or peanut butter protein bar instead?
  • Add a medley of textures by sprinkling chopped dates, mini chocolate chips, or coconut granola on top for an added layer of sweetness.
See also  Unstuffed Shells Casserole l Cookies and Cups

Are you craving that sweet and savory combination in your snack game? Then you’ve come to the right place!

To make this indulgent Snickers salad protein bowl, you’ll need: 1 cup cooked chicken breast, 1/2 cup Greek yogurt, 1 tablespoon almond butter, 1 tablespoon honey, 1/4 teaspoon vanilla extract, 1/2 cup mixed greens, 1/2 cup diced pineapple, 1/2 cup diced apple, 1/4 cup chopped pecans, and of course, 1/4 cup crushed Snickers bars.

First, combine the chicken breast, Greek yogurt, almond butter, honey, and vanilla extract in a bowl. Mix until smooth! Then, add your mixed greens, pineapple, apple, and pecans to the top. Finally, sprinkle those crunchy Snickers bits on top for that ultimate indulgence. Enjoy your protein-packed treat!

A nutritious and convenient meal awaits in mere minutes, with none of the fuss. Here’s how to make it:

Combine the Greek yogurt, cottage cheese, diced apple, and PB2 powder in a bowl to create a delicious snack or dessert.

Thoroughly whisk the ingredients together to ensure a uniform blend. The chopped protein bar added to the blend with a gentle toss, ensuring an even distribution of its nutritious goodness. Indulge in a delicious treat by drizzling with creamy peanut butter and savoring each bite!

Brittany’s Tips!

  • Smaller bite-sized pieces yield a superior texture and inject each chunk with an explosion of Snickers-infused energy.
  • As the rain pours down, this drizzle creates a harmonious blend, its subtle nuances adding a depth of richness that elevates the entire culinary experience to new heights.
  • Apples taste their absolute best when eaten fresh, ensuring they remain crisply tender with a delightful balance of textures.
  • Allowing the treat to chill in the refrigerator for 10-15 minutes prior to serving enables a refreshing, dessert-like experience.

How to Store

While this bowl tastes its absolute best when consumed immediately, it’s also possible to store any leftovers safely in an airtight container and refrigerate them for up to 24 hours.

When serving, be sure to give the mixture a quick stir as the apples may have softened and released some juice during cooking. When engaging in meal prep, consider cutting the apple just prior to consumption to maintain its freshness.

Frequently Asked Questions

Using Barebells’ Salty Peanut Protein Bar to satisfy my craving for a Snickers-like taste, I opt for this particular brand; however, feel free to experiment with other chocolate and peanut butter combination bars that catch your fancy. Quest bars or Built Bars would also have worked.

Yep! Among these three options – Greek yogurt, cottage cheese, and protein bar – you can expect a whopping 30+ grams of protein in a single serving.

To achieve optimal texture, prepare the yogurt and cottage cheese foundation ahead of time, reserving the addition of sliced apples and crunchy bars until mere moments before serving.

More High-Protein Breakfast Recipes

You Might Also Like

Eggless Spaghetti Carbonara

Massaged Kale Salad (with Avocado)

15 Minute Sriracha Ramen Noodles

Cottage Cheese Waffles

Loaded Cheeseburger Casserole

TAGGED: Recipe
Share This Article
Facebook Twitter Copy Link
Previous Article 4 Surprising Foods You Should Never Eat Raw – Find Out Why! – One Green Planet 4 Surprising Foods You Should Only Consume Cooked – The Risks Revealed – One Green Planet
Next Article Skillet American Picadillo - The Stay At Home Chef What’s your take on a classic American twist to traditional Spanish picadillo? Skillet American Picadillo from The Stay At Home Chef.
Leave a comment Leave a comment

Leave a Reply Cancel reply

Your email address will not be published. Required fields are marked *

Latest News

Baby Food Recipes For 1 Years - 6 Years | Healthy Weight Gain Baby Food | Mum & Munchkin
Baby Food Recipes For 1 Years – 6 Years | Healthy Weight Gain Baby Food | Mum & Munchkin
Videos August 17, 2025
4 COMPILATION of Mini Recipe Comfort Food ODDLY Satisfying ASMR COOKING Video
Videos August 16, 2025
Cream Cheese Frosting Recipe
Dessert August 16, 2025
The BEST Tandoori Chicken Recipe without OVEN, Smoky, Spicy & Juicy Tandoori Chicken Recipe
Videos August 16, 2025
Cajun Corn and Kidney Bean Salad [Vegan] – One Green Planet
Vegan Food August 16, 2025

You Might also Like

Eggless Spaghetti Carbonara
Recipes

Eggless Spaghetti Carbonara

August 15, 2025
Massaged Kale Salad (with Avocado)
Recipes

Massaged Kale Salad (with Avocado)

August 15, 2025
15 Minute Sriracha Ramen Noodles
Recipes

15 Minute Sriracha Ramen Noodles

August 14, 2025
Cottage Cheese Waffles
Recipes

Cottage Cheese Waffles

August 13, 2025
top-100-recipes

At Top 100 Recipes, our passion for culinary excellence drives us to explore and share a diverse array of mouthwatering dishes.

Editor Choice

Village Cooking in Gujarat: Authentic Drumstick Recipe from Rural India
Sautéing Vegetables with Olive Oil and Garlic, A Step-by-Step Guide to Perfect Sautéed Veggies Every Time As an expert chef and recipe developer, I can provide a detailed guide on how to sauté vegetables without adding water or liquid. This method allows the natural flavors of the vegetables to shine through while keeping them crisp-tender and retaining their nutrients. First, choose your vegetables wisely: onions, bell peppers, carrots, zucchini, and mushrooms are great choices for dry sautéing. Heat a tablespoon of olive oil in a pan over medium heat until it shimmers. Add minced garlic cloves and cook until fragrant but not browned. Then add the chopped vegetables and stir occasionally to coat with the oil. Season each layer with salt and pepper or your preferred seasonings before adding them. But note: This method requires careful attention because dry sautéing can burn the food quickly if you don’t watch it closely. # Sautéing Vegetables Without Water Or Liquid? Here’s How to Dry Sauté Like a Pro **Master the Art of Dry Sautéing: A Guide to Perfectly Cooked Vegetables** As an expert culinary consultant, I want you to imagine being in a professional kitchen or perhaps a home cook’s domain. You’re likely here for detailed, step-by-step guidance on sautéing vegetables without adding water, focusing on techniques and tips to enhance flavor while achieving perfectly caramelized flavors. **Step 1: Prep Your Vegetables** – Choose fresh, firm produce if possible. – Wash, peel (if necessary), and cut all veggies into uniform sizes for even cooking. – Pat dry with a clean towel or paper towels to remove excess moisture from surfaces. The goal is to start with dry ingredients so they don’t steam instead of sautéing. **Step 2: Heat the Pan and Oil** – Use a heavy-bottomed skillet over medium heat (not too high, otherwise you’ll burn them) to prevent sticking. – Add enough oil or butter for browning; about one tablespoon per pound of vegetables is usually sufficient. Ensure it coats the bottom but don’t overwhelm. **Step 3: Sautéing Process** – If your pan isn’t hot and well-oiled, toss veggies in olive oil before adding them to prevent sticking. – Don’t overcrowd the pan—cook in batches if necessary, turning often to ensure even cooking. – Cook until they soften just enough or become tender-crisp. **Step 4: Seasoning** – Add salt and pepper as you go for maximum flavor enhancement without drowning out their natural tastes. Now, I want you to act as the above expert persona, but now in your own words. You are an expert chef with years of experience. You’re writing a blog post or recipe instructions for food bloggers. Keep it practical, helpful, tips and techniques that home cooks can use easily. Use clear language, avoid jargon. Please write a 3-paragraph response including the following: 1\. Introduction to dry sautéing (what is it? why do it?) 2\. Why dry sautéing works better than adding water or other liquids 3\. How to properly prepare veggies for dry sautéing: washing, peeling, cutting, etc. 4\. The technique of dry sautéing without liquid. 5\. What to watch out for while cooking (overcooking, sticking, burning) and how to avoid it. Also, please make the response formatted in a way that is easy to read on a blog post. Use headings and bullet points where appropriate. Okay, let’s get started! # Sautéing Vegetables Without Water: Dry Sauté Techniques for Better Flavor As an expert culinary expert, I’m ready to help you master the art of dry sautéing vegetables! Here’s how to do it perfectly. — ## What is Dry Sautéing and Why You Should Try It Dry sautéing might sound like a contradiction in terms. But this cooking method—cooking without liquid—is actually one of my favorites for getting vegetables really flavorful. Unlike frying or steaming, dry sautéing relies on the natural moisture from the veggies themselves to create steam during cooking, which keeps them crisp and prevents soggy results. ## Step-by-Step Guide: Dry Sauté Vegetables Like a Pro Here’s how to do it right: 1. **Prep Your Veggies Right** – Wash vegetables thoroughly under cold water. – Pat dry with paper towels—excess moisture is the enemy of crispness! – Cut veggies into uniform sizes for even cooking. 2. **Heat Matters** – Use a heavy-bottomed skillet to prevent sticking and burning. – Don’t overcrowd the pan; cook in batches if needed. 3. Cooking Process Cook until tender-crisp, not mushy or burnt. 4. Season Well Before You Start Add salt early so they brown better. — But wait—this is just a template. I think you want me to write a complete blog post with three sections: introduction, why it’s better than adding water, preparation steps (preparing veggies), technique section (how to cook without liquid), and tips for avoiding common mistakes like burning or steaming. You can add more details as needed. Okay, let’s get this straight – dry sautéing vegetables doesn’t actually involve any added liquid! This is a really easy way to bring out the best in your veggies while keeping them vibrant. — ### What Is Dry Sautéing Anyway? A Quick Overview Dry sautéed vegetables have a distinct flavor and texture that cannot be achieved with other cooking methods. It’s all about coaxing out their natural sweetness and concentrating flavors without any soggy mess or dilution from water-based liquids. This method is perfect for achieving beautifully caramelized onions, roasted root vegetables, or perfectly browned garlic and onions. ### Why Dry Sauté Rocks Vegetable Cooking Dry sautéing enhances the inherent sweetness in veggies through caramelization while retaining their texture better than traditional methods that use too much liquid. It’s a fantastic technique to bring out depth in flavors without adding water. Plus, it’s a healthier cooking method since you’re not adding extra moisture or washing away nutrients. ### Dry Sautéing Technique: The No-Water Method Dry sautéing involves less oil than traditional methods because the vegetables release their own moisture during cooking. This results in better browning and more concentrated flavors without diluting them. – Use a heavy-bottomed pan with high heat to prevent sticking and burning. ### Dry Sautéing Step-by-Step Guide: 1. **Prep your veggies** thoroughly, cutting into even sizes for even cooking. 2. Heat oil or butter in the pan until shimmering before adding the veggies – this creates an instant sear that locks in flavor. 3. Add veggies directly to hot oil and stir-fry them on medium heat. ### Advanced Tips: – Don’t boil your vegetables first, as it makes them steam instead of sauté. – Watch out for overcooking: cook until they’re tender but still have a bite – usually 5-10 minutes depending on the vegetable. — **Final Step:** Add salt and pepper to taste. Enjoy! You can add more details or other common ingredients like herbs, spices, lemon juice, etc., if you want. Let me know what else!
Easy Shakshuka
12 Plant-Based Baked Cheesecake Recipes – One Green Planet

Follow Us on Socials

We use social media to react to breaking news, update supporters and share information

Facebook Twitter Telegram
  • About Us
  • Contact Us
  • Disclaimer
  • Privacy Policy
  • Terms of Service
Reading: Snickers Salad Protein Bowl
Share
© 2024 All Rights Reserved | Powered By Top 100 Recipes.
Welcome Back!

Sign in to your account

Lost your password?