By using this site, you agree to the Privacy Policy and Terms of Use.
Accept
Top 100 RecipesTop 100 RecipesTop 100 Recipes
  • Home
  • Recipes
  • Keto Food
  • Vegan Food
  • Dessert
  • Drinks
  • Videos
Reading: Sponge Candy Recipe | How To Make Old Fashioned Candy
Share
Notification Show More
Top 100 RecipesTop 100 Recipes
Search
  • Home
  • Recipes
  • Keto Food
  • Vegan Food
  • Dessert
  • Drinks
  • Videos
Follow US
© 2024 All Rights Reserved | Powered By Top 100 Recipes.
Top 100 Recipes > Dessert > Sponge Candy Recipe | How To Make Old Fashioned Candy
Dessert

Sponge Candy Recipe | How To Make Old Fashioned Candy

July 31, 2024
Share
8 Min Read
Sponge Candy Recipe | How To Make Old Fashioned Candy
SHARE
Shelly
Nov 11, 2019
Oct 4, 2021

Contents
Sponge Candy is a Nostalgic and Simple Candy!What IS Sponge Candy?How Do You Make Sponge Candy?How To Store ItHow Long Will Sponge Candy Last?Can You Freeze It? Looking For More Candy Recipes? Try These:DescriptionNotesNutritionWant To Save This Recipe?Find more recipes like this:

Sponge Candy Pin

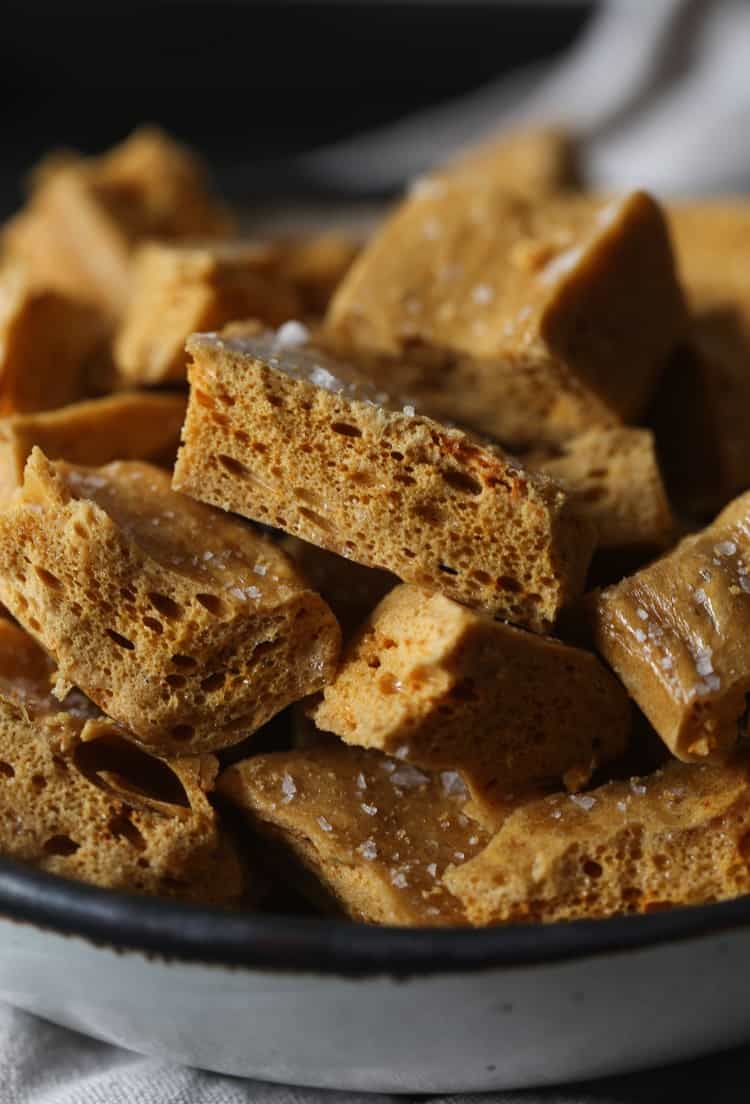
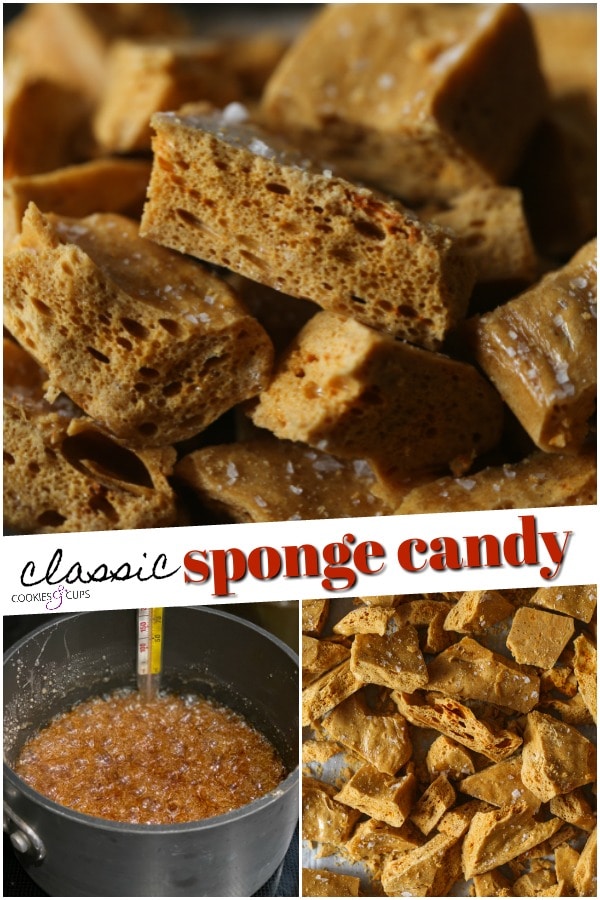
Sponge Candy is a classic hard candy recipe that has a sponge-like texture on the inside and a subtle sweetness. Dip it or drizzle it with chocolate or sprinkle with a little flaked sea salt for an old fashioned treat!

Sponge Candy showing off textured middle

Sponge Candy is a Nostalgic and Simple Candy!

I am super excited about today’s recipe! I love making candy, but I don’t seem to do it very often, which is a shame. It’s generally pretty easy, and if you trust your candy thermometer you’re already ahead of the game!

I do have a feeling that this recipe might spark controversy in the way of name. There are so many names given to this type of candy that you might know it as Honeycomb Candy, Sea Foam, or Cinder Toffee to name a few. Some recipes use honey, some don’t use vinegar, some might include molasses…there are all sorts of variations. I found that the different names for Sponge Candy can be regional, but please note they are all very similar!

Sponge candy topped with salt

What IS Sponge Candy?

Sponge Candy is a toffee-style hard candy that is crunchy and sweet with a sponge-like texture on the inside.

You achieve this texture by boiling the candy as you would any other hard candy, but as soon as it reaches 300°F on the candy thermometer you add in baking soda which reacts with the vinegar in the candy creating carbon dioxide. This makes the candy bubble up giving it the airy texture you see!

See also  Skillet Chocolate Chip Cookie | Cookies & Cups

So basically it’s like a science experiment and a sweet treat all in one place!

How to make sponge candy

How Do You Make Sponge Candy?

Making this candy recipe is actually very simple, but I want to share some tips that I have learned to make the process as fool proof as possible!

  • Use a heavy-bottomed saucepan. This is a tip that is recommended for pretty much all candy making. This will distribute the heat evenly, so everything is the same temperature in the pan.
  • Use a reliable candy thermometer. This is something I always struggled with, but I surrendered my trust issues and let the thermometer do its job 🙂 I linked to the one I use in the “shoppable” image above.
  • Don’t over mix! Once the candy starts to boil don’t stir the mixture. Allow it to come up to 300°F. THEN when you add the baking soda, use a rubber spatula or wooden spoon to stir it in. You want to combine the baking soda evenly but you don’t want to over mix it because you will pop all those little bubbles. Really you should only mix 5 – 10 strokes at most so you don’t deflate the bubbles.
  • Careful when you spread. When you transfer the candy to your prepared dish try your best to pour it into the pan as evenly as possible because you won’t want to spread it using a spatula, because again, this will pop the bubbles and your pretty sponge texture will be lost.
  • Add the sea salt quickly! If you are going to sprinkle your Sponge Candy with salt you will want to do it as soon as you get it into the pan before it cools so it sticks!
  • Break your Sponge Candy into pieces! This is the fun part. Use a mallet or a knife to break the candy into pieces. I don’t worry too much about my pieces being perfect. I like the rustic vibe of the broken pieces. You can also drizzle or dip them in chocolate, which is a popular way to enjoy sponge candy!
Lightly salted honeycomb candy served in a bowl

How To Store It

Make sure that once you break your candy into pieces you store it in an airtight container, even a zip-top bag will work. Just make sure you keep all humidity away from the candy because it will get sticky.

How Long Will Sponge Candy Last?

If stored properly your candy will last anywhere from 2 weeks to months.

Can You Freeze It?

Yes you can. It can sometimes get a little sticky when it thaws out, so make sure to thaw it out in a very dry place, not in the refrigerator.

Looking For More Candy Recipes? Try These:

Print

clock clock iconcutlery cutlery iconflag flag iconfolder folder iconinstagram instagram iconpinterest pinterest iconfacebook facebook iconprint print iconsquares squares iconheart heart iconheart solid heart solid icon


Description

We call this old-fashioned candy Sponge Candy, but it’s also known as Sea Foam, Honeycomb candy , Angel Food Candy or Hokey-Pokey to name a few!


  • 1 cup light corn syrup
  • 1 cup light brown sugar
  • 1 tablespoon white vinegar
  • 2 teaspoons baking soda
  • optional garnish – flaked sea salt


  1. Line a 9×9 baking dish with parchment paper and set aside.
  2. In a medium heavy-bottomed, tall sided saucepan over medium heat, stir together the corn syrup, brown sugar, and vinegar. Stir frequently, bringing mixture to a boil.
  3. Once the mixture is boiling, attach a candy thermometer to the side of the saucepan, making sure the tip of the thermometer is in the boiling liquid, but not touching the bottom of the pan.
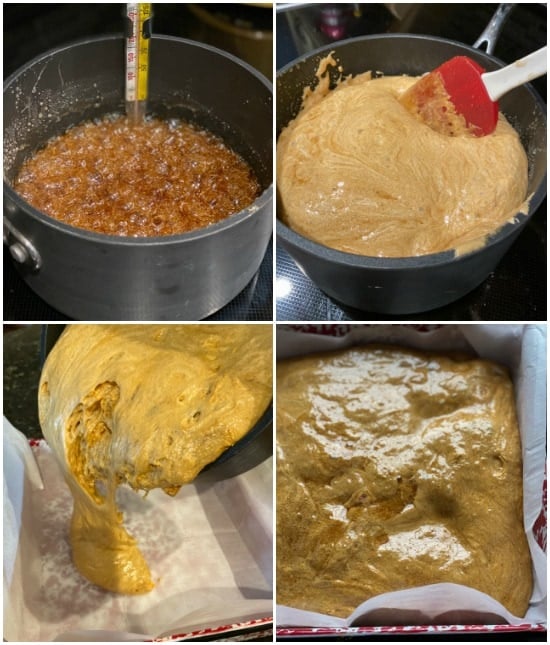
  4. Continue to cook on medium without stirring the candy until it reaches 300°F on your candy thermometer.
  5. Remove the pan from the heat and stir in the baking soda. Mixture will bubble up creating the bubbles and texture in the candy. Mix only until the baking soda is evenly combined, careful not to over-stir as this will deflate the bubbles.
  6. Pour the mixture into the prepared pan as evenly as you can. Tilt the pan around to help the candy spread, but don’t hit the pan or use a spatula to spread, as this will deflate the bubbles. It’s ok if it’s not perfectly even.
  7. Sprinkle with flaked sea salt if desired, and allow the candy to cool in the pan for at least an hour.
  8. Remove candy from the pan using the parchment paper to lift it out and break the candy into pieces using a mallet or a knife. I don’t worry too much about the pieces being perfectly shaped.


Notes

Store airtight for up to a week, even longer if store in a very dry environment. If it’s humid or moisture hits the candy it will become sticky. Optional – coat or drizzle the candy with melted chocolate

Nutrition

  • Serving Size: 1 piece
  • Calories: 72
  • Sugar: 19 g
  • Sodium: 212.9 mg
  • Fat: 0 g
  • Carbohydrates: 19.1 g
  • Protein: 0 g
  • Cholesterol: 0 mg

Want To Save This Recipe?

Find more recipes like this:

PIN for later!

Sponge Candy Pinterest collage

You Might Also Like

Kitchen Sink Ice Cream – Barefeet in the Kitchen What makes this recipe so special is that you don’t need a specific flavor combination or a particular set of ingredients to make it. You can simply use whatever mix-ins and flavors you have on hand, which makes it incredibly versatile.

What a sweet delight: Homemade Coconut Syrup. With its rich, velvety texture and subtle coconut flavor, this syrup is the perfect addition to your favorite beverages or desserts.

Savoring every bite of creamy goodness, I’m thrilled to share my recipe for homemade Sour Cream Ice Cream. This unique and indulgent flavor combination is a game-changer – sweet creaminess melds with tangy sour cream for an unforgettable taste experience that will leave you wanting more. The rich, velvety texture coats your tongue as the subtle tartness of the sour cream balances out the sweetness, making this ice cream a true standout in the world of frozen treats.

What’s a Copycat Butter Cake? We’re about to find out!

Banana Cream Pie Recipe | Cookies & Cups

TAGGED: Dessert
Share This Article
Facebook Twitter Copy Link
Previous Article 6 EASY 20-Minute Japanese Lunch Box Recipes | Quick & Simple Bento Box Recipes for Beginners 6 EASY 20-Minute Japanese Lunch Box Recipes | Quick & Simple Bento Box Recipes for Beginners
Next Article Old Fashioned Coleslaw with Vinegar Old Fashioned Coleslaw with Vinegar
Leave a comment Leave a comment

Leave a Reply Cancel reply

Your email address will not be published. Required fields are marked *

Latest News

Popeye's Vegan Dinner
Quick Spinach Curry [Vegan] – One Green Planet
Vegan Food May 17, 2025
Miniature Full Chicken Biryani + Chicken Curry | Mini Foodkey
Videos May 17, 2025
Thumbprint Cookies [Vegan, Gluten-Free]
These tender, chewy Thumbprint Cookies are a game-changer for those with dietary restrictions. Made with wholesome ingredients and no animal products or gluten in sight, they’re perfect for snacking on the go. To get started, preheat your oven to 375°F (190°C). In a medium-sized bowl, whisk together 1 cup of vegan butter and 3/4 cup of granulated sugar until light and fluffy. Next, add in 1/2 cup of creamy peanut butter and give it a good stir. Then, mix in 1 egg replacement (such as Ener-G Egg Replacer or flaxseed) and 1 teaspoon of vanilla extract. In a separate bowl, whisk together 1 1/4 cups of gluten-free all-purpose flour, 1/2 cup of rolled oats, and 1/4 teaspoon of salt. Gradually add the dry ingredients to the wet mixture until a dough forms. Scoop tablespoon-sized balls onto a baking sheet lined with parchment paper. Use your thumb or the back of a spoon to make an indentation in each cookie. Fill the hole with a little jam or chocolate chips – your choice! Bake for 12-15 minutes, or until the edges are set and the centers are slightly puffed. Remove from the oven and let cool on the baking sheet for 5 minutes before transferring to a wire rack. Enjoy your delicious vegan, gluten-free Thumbprint Cookies!
Vegan Food May 17, 2025
3 EASY AND DELICIOUS AIR FRYER BREAKFAST RECIPES | SAM THE COOKING GUY
Here are three air fryer breakfast recipes that you’ll love: Get your day started with a sweet and savory twist: Air Fryer Cinnamon Roll Waffles! * 1 waffle mix, prepared according to package instructions * 1/4 cup cinnamon sugar * 2 tbsp butter, melted * 1 egg, beaten Preheat air fryer to 375°F (190°C). In a bowl, whisk together waffle mix, cinnamon sugar, and melted butter. Pour into the air fryer basket and cook for 5-6 minutes, or until golden brown. Serve warm with a dollop of whipped cream. Next up: Air Fryer Breakfast Burritos! * 4 large eggs * 1/2 cup cooked sausage (such as chorizo or breakfast links), crumbled * 1/2 cup shredded cheese (Cheddar or Monterey Jack work great) * 4 tortillas Preheat air fryer to 375°F (190°C). In a bowl, whisk together eggs and a pinch of salt. Cook the mixture in the air fryer basket for 3-4 minutes, stirring occasionally, until scrambled. Meanwhile, cook sausage in a pan over medium-high heat until browned. Assemble burritos with scrambled eggs, sausage, cheese, and wrap in tortilla. Air fry for an additional 2-3 minutes, or until crispy. Last but not least: Air Fryer Quiche Lorraine!
Videos May 17, 2025
Lemon Seitan With Creamy Polenta [Vegan]
Luscious Lemon Seitan with Velvety Vegan Polenta – A Harmony of Flavors and Textures
Vegan Food May 17, 2025

You Might also Like

kitchen sink ice cream in a bread pan with an ice cream scoop
Dessert

Kitchen Sink Ice Cream – Barefeet in the Kitchen What makes this recipe so special is that you don’t need a specific flavor combination or a particular set of ingredients to make it. You can simply use whatever mix-ins and flavors you have on hand, which makes it incredibly versatile.

May 16, 2025
Coconut syrup in a pitcher.
Dessert

What a sweet delight: Homemade Coconut Syrup. With its rich, velvety texture and subtle coconut flavor, this syrup is the perfect addition to your favorite beverages or desserts.

May 13, 2025
Sour Cream Ice Cream - Barefeet in the Kitchen
Dessert

Savoring every bite of creamy goodness, I’m thrilled to share my recipe for homemade Sour Cream Ice Cream. This unique and indulgent flavor combination is a game-changer – sweet creaminess melds with tangy sour cream for an unforgettable taste experience that will leave you wanting more. The rich, velvety texture coats your tongue as the subtle tartness of the sour cream balances out the sweetness, making this ice cream a true standout in the world of frozen treats.

May 9, 2025
Copycat Butter Cake - Cookies and Cups
Dessert

What’s a Copycat Butter Cake? We’re about to find out!

May 6, 2025
top-100-recipes

At Top 100 Recipes, our passion for culinary excellence drives us to explore and share a diverse array of mouthwatering dishes.

Editor Choice

Broccoli and Spinach Pâté Tart: A Vegan, Gluten-Free Delight Indulge in the creamy, plant-based goodness of this broccoli and spinach pâté tart, expertly crafted to satisfy your taste buds while aligning with your dietary needs.
Indulge in 10 Irresistible Ravioli Dishes That Will Leave You Wanting More! – One Green Planet
HOW TO MAKE THE BEST FLAKY GROUND BEEF EMPANADAS
Celebrate #PumpkinCheesecakeDay with these 15 scrumptious recipes that will make it your new favorite holiday.

Follow Us on Socials

We use social media to react to breaking news, update supporters and share information

Facebook Twitter Telegram
  • About Us
  • Contact Us
  • Disclaimer
  • Privacy Policy
  • Terms of Service
Reading: Sponge Candy Recipe | How To Make Old Fashioned Candy
Share
© 2024 All Rights Reserved | Powered By Top 100 Recipes.
Welcome Back!

Sign in to your account

Lost your password?