By using this site, you agree to the Privacy Policy and Terms of Use.
Accept
Top 100 RecipesTop 100 RecipesTop 100 Recipes
  • Home
  • Recipes
  • Keto Food
  • Vegan Food
  • Dessert
  • Drinks
  • Videos
Reading: Vanilla Blackberry Cupcakes [Vegan] – One Green Planet
Share
Notification Show More
Top 100 RecipesTop 100 Recipes
Search
  • Home
  • Recipes
  • Keto Food
  • Vegan Food
  • Dessert
  • Drinks
  • Videos
Follow US
© 2024 All Rights Reserved | Powered By Top 100 Recipes.
Top 100 Recipes > Vegan Food > Vanilla Blackberry Cupcakes [Vegan] – One Green Planet
Vegan Food

Vanilla Blackberry Cupcakes [Vegan] – One Green Planet

March 23, 2025
Share
3 Min Read
Vanilla Blackberry Cupcakes [Vegan] – One Green Planet
SHARE

Contents
Vanilla Blackberry Cupcakes [Vegan]Ingredients You Need for Vanilla Blackberry Cupcakes [Vegan]How to Prepare Vanilla Blackberry Cupcakes [Vegan]Vanilla Blackberry Cupcakes [Vegan]

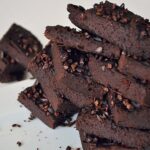
These Vanilla Blackberry Vegan Cupcakes are beautiful, as they are delicious. I used to think that apple cider vinegar was overrated, and if you’re not baking to impress anyone, sure, you can do without it, but if you’re going for the show-stopper, do not omit it. It makes the cupcakes so much lighter and fluffier, creating the perfect texture. You could substitute apple sauce for the oil, I suppose, but I have yet to try that. The cornstarch gives the cupcakes a golden color, but if you don’t have any in the kitchen, don’t sweat it.

I also find the perfect icing is 1 part vegan margarine, 3 parts sugar.

These little beauties will make you the queen/king of cupcakes among your friends and family. You don’t have to tell them it’s not your recipe. Let’s make it our little secret.

Vanilla Blackberry Cupcakes [Vegan]

Ingredients You Need for Vanilla Blackberry Cupcakes [Vegan]

For the cupcakes

  • 2 cups self-raising flour, sifted
  • 3/4 cup + 2 tbsp brown sugar
  • 2 tbsp cornstarch
  • 1 cup + 2 tbsp soy milk
  • 1 tsp apple cider vinegar
  • 3 tbsp vegetable oil (preferably canola)
  • 3 generous tsps vanilla extract
  • a pinch of salt
  • a pinch of baking soda and baking powder

For the icing

  • 1/2 cup blackberries, plus 12 to decorate
  • 3/4 cup vegan margarine
  • 3 cups confectioner’s sugar
  • a few drops of blue food colour (optional)

How to Prepare Vanilla Blackberry Cupcakes [Vegan]

  1. Pre-heat the oven to 180ºC/356ºF. Pour the milk and apple cider vinegar into a small jug or bowl and let it curdle for a few minutes.
  2. Sift the flour into a large bowl, then add the rest of the dry ingredients. Add the oil, vanilla extract and the curdled milk and combine everything with a spatula/spoon. Remember not to overmix, as they toughens up the batter and ruins the whole batch of cupcakes.
  3. Pour into lined cupcake tins and bake in the oven for 22-25 minutes.
  4. For the icing beat the vegan margarine and confectioner’s sugar with an electric mixer (or a fork if you’re building up muscle or whatever). Puree the blackberries very well and add to the icing, beating again until perfectly, totally, undeniably smooth. It may be easier to blend the blackberries first, but I haven’t tried this. Basically, you want to avoid leaving in any bits, however small, as they will clog up the nozzle of your icing bag. The blackberries will turn the icing dark pink, so you will need some blue food color to make the icing purple.
  5. When the cupcakes have definitely cooled, ice and decorate them with a blackberry on each.
See also  6 Cooking Tips That Will Make You Love Tofu – One Green Planet

You Might Also Like

15 Fudgy Vegan Brownies and Blondies Made With Beans (Seriously!) – One Green Planet

5 Nourishing Plant-Based Recipes Perfect for Ramadan – One Green Planet

The Peruvian Superfood That Naturally Boosts Energy & Stamina – One Green Planet

Berry Lavender Poached Pears With Granola [Vegan, Gluten-Free] – One Green Planet

Winter Squash and Sage Pizza [Vegan, Gluten-Free] – One Green Planet

TAGGED: Vegan, Vegan Food
Share This Article
Facebook Twitter Copy Link
Previous Article Easy Chilli Soya Restaurant Style | Soya Chunks Recipe | Soya Chilli | high protein | Chef Ashok Easy Chilli Soya Restaurant Style | Soya Chunks Recipe | Soya Chilli | high protein | Chef Ashok
Next Article Savory Spinach Tofu Gnudi Balls [Vegan] – One Green Planet Savory Spinach Tofu Gnudi Balls [Vegan] – One Green Planet
Leave a comment Leave a comment

Leave a Reply Cancel reply

Your email address will not be published. Required fields are marked *

Latest News

15 Fudgy Vegan Brownies and Blondies Made With Beans (Seriously!) – One Green Planet
Vegan Food March 19, 2026
No Bake No cheese Cake| सिर्फ 4 चीजो बनाई, मजा आ गया खा कर | 😀
Videos March 19, 2026
5 Nourishing Plant-Based Recipes Perfect for Ramadan – One Green Planet
Vegan Food March 19, 2026
The Peruvian Superfood That Naturally Boosts Energy & Stamina – One Green Planet
Vegan Food March 19, 2026
A horizontally aligned image showing a bowl of southwest pasta salad on a wooden tabletop.
Southwest Pasta Salad – Barefeet in the Kitchen
Recipes March 19, 2026

You Might also Like

15 Fudgy Vegan Brownies and Blondies Made With Beans (Seriously!) – One Green Planet
Vegan Food

15 Fudgy Vegan Brownies and Blondies Made With Beans (Seriously!) – One Green Planet

March 19, 2026
5 Nourishing Plant-Based Recipes Perfect for Ramadan – One Green Planet
Vegan Food

5 Nourishing Plant-Based Recipes Perfect for Ramadan – One Green Planet

March 19, 2026
The Peruvian Superfood That Naturally Boosts Energy & Stamina – One Green Planet
Vegan Food

The Peruvian Superfood That Naturally Boosts Energy & Stamina – One Green Planet

March 19, 2026
Berry Lavender Poached Pears With Granola [Vegan, Gluten-Free] – One Green Planet
Vegan Food

Berry Lavender Poached Pears With Granola [Vegan, Gluten-Free] – One Green Planet

March 19, 2026
top-100-recipes

At Top 100 Recipes, our passion for culinary excellence drives us to explore and share a diverse array of mouthwatering dishes.

Editor Choice

Apple Crisp Recipe | The Stay At Home Chef
Raw Ice Cream Cake With Matcha, Blueberry, and Vanilla Layers [Vegan] – One Green Planet
Sautéing Vegetables with Olive Oil and Garlic, A Step-by-Step Guide to Perfect Sautéed Veggies Every Time As an expert chef and recipe developer, I can provide a detailed guide on how to sauté vegetables without adding water or liquid. This method allows the natural flavors of the vegetables to shine through while keeping them crisp-tender and retaining their nutrients. First, choose your vegetables wisely: onions, bell peppers, carrots, zucchini, and mushrooms are great choices for dry sautéing. Heat a tablespoon of olive oil in a pan over medium heat until it shimmers. Add minced garlic cloves and cook until fragrant but not browned. Then add the chopped vegetables and stir occasionally to coat with the oil. Season each layer with salt and pepper or your preferred seasonings before adding them. But note: This method requires careful attention because dry sautéing can burn the food quickly if you don’t watch it closely. # Sautéing Vegetables Without Water Or Liquid? Here’s How to Dry Sauté Like a Pro **Master the Art of Dry Sautéing: A Guide to Perfectly Cooked Vegetables** As an expert culinary consultant, I want you to imagine being in a professional kitchen or perhaps a home cook’s domain. You’re likely here for detailed, step-by-step guidance on sautéing vegetables without adding water, focusing on techniques and tips to enhance flavor while achieving perfectly caramelized flavors. **Step 1: Prep Your Vegetables** – Choose fresh, firm produce if possible. – Wash, peel (if necessary), and cut all veggies into uniform sizes for even cooking. – Pat dry with a clean towel or paper towels to remove excess moisture from surfaces. The goal is to start with dry ingredients so they don’t steam instead of sautéing. **Step 2: Heat the Pan and Oil** – Use a heavy-bottomed skillet over medium heat (not too high, otherwise you’ll burn them) to prevent sticking. – Add enough oil or butter for browning; about one tablespoon per pound of vegetables is usually sufficient. Ensure it coats the bottom but don’t overwhelm. **Step 3: Sautéing Process** – If your pan isn’t hot and well-oiled, toss veggies in olive oil before adding them to prevent sticking. – Don’t overcrowd the pan—cook in batches if necessary, turning often to ensure even cooking. – Cook until they soften just enough or become tender-crisp. **Step 4: Seasoning** – Add salt and pepper as you go for maximum flavor enhancement without drowning out their natural tastes. Now, I want you to act as the above expert persona, but now in your own words. You are an expert chef with years of experience. You’re writing a blog post or recipe instructions for food bloggers. Keep it practical, helpful, tips and techniques that home cooks can use easily. Use clear language, avoid jargon. Please write a 3-paragraph response including the following: 1\. Introduction to dry sautéing (what is it? why do it?) 2\. Why dry sautéing works better than adding water or other liquids 3\. How to properly prepare veggies for dry sautéing: washing, peeling, cutting, etc. 4\. The technique of dry sautéing without liquid. 5\. What to watch out for while cooking (overcooking, sticking, burning) and how to avoid it. Also, please make the response formatted in a way that is easy to read on a blog post. Use headings and bullet points where appropriate. Okay, let’s get started! # Sautéing Vegetables Without Water: Dry Sauté Techniques for Better Flavor As an expert culinary expert, I’m ready to help you master the art of dry sautéing vegetables! Here’s how to do it perfectly. — ## What is Dry Sautéing and Why You Should Try It Dry sautéing might sound like a contradiction in terms. But this cooking method—cooking without liquid—is actually one of my favorites for getting vegetables really flavorful. Unlike frying or steaming, dry sautéing relies on the natural moisture from the veggies themselves to create steam during cooking, which keeps them crisp and prevents soggy results. ## Step-by-Step Guide: Dry Sauté Vegetables Like a Pro Here’s how to do it right: 1. **Prep Your Veggies Right** – Wash vegetables thoroughly under cold water. – Pat dry with paper towels—excess moisture is the enemy of crispness! – Cut veggies into uniform sizes for even cooking. 2. **Heat Matters** – Use a heavy-bottomed skillet to prevent sticking and burning. – Don’t overcrowd the pan; cook in batches if needed. 3. Cooking Process Cook until tender-crisp, not mushy or burnt. 4. Season Well Before You Start Add salt early so they brown better. — But wait—this is just a template. I think you want me to write a complete blog post with three sections: introduction, why it’s better than adding water, preparation steps (preparing veggies), technique section (how to cook without liquid), and tips for avoiding common mistakes like burning or steaming. You can add more details as needed. Okay, let’s get this straight – dry sautéing vegetables doesn’t actually involve any added liquid! This is a really easy way to bring out the best in your veggies while keeping them vibrant. — ### What Is Dry Sautéing Anyway? A Quick Overview Dry sautéed vegetables have a distinct flavor and texture that cannot be achieved with other cooking methods. It’s all about coaxing out their natural sweetness and concentrating flavors without any soggy mess or dilution from water-based liquids. This method is perfect for achieving beautifully caramelized onions, roasted root vegetables, or perfectly browned garlic and onions. ### Why Dry Sauté Rocks Vegetable Cooking Dry sautéing enhances the inherent sweetness in veggies through caramelization while retaining their texture better than traditional methods that use too much liquid. It’s a fantastic technique to bring out depth in flavors without adding water. Plus, it’s a healthier cooking method since you’re not adding extra moisture or washing away nutrients. ### Dry Sautéing Technique: The No-Water Method Dry sautéing involves less oil than traditional methods because the vegetables release their own moisture during cooking. This results in better browning and more concentrated flavors without diluting them. – Use a heavy-bottomed pan with high heat to prevent sticking and burning. ### Dry Sautéing Step-by-Step Guide: 1. **Prep your veggies** thoroughly, cutting into even sizes for even cooking. 2. Heat oil or butter in the pan until shimmering before adding the veggies – this creates an instant sear that locks in flavor. 3. Add veggies directly to hot oil and stir-fry them on medium heat. ### Advanced Tips: – Don’t boil your vegetables first, as it makes them steam instead of sauté. – Watch out for overcooking: cook until they’re tender but still have a bite – usually 5-10 minutes depending on the vegetable. — **Final Step:** Add salt and pepper to taste. Enjoy! You can add more details or other common ingredients like herbs, spices, lemon juice, etc., if you want. Let me know what else!
Greek Chicken Wrap

Follow Us on Socials

We use social media to react to breaking news, update supporters and share information

Facebook Twitter Telegram
  • About Us
  • Contact Us
  • Disclaimer
  • Privacy Policy
  • Terms of Service
Reading: Vanilla Blackberry Cupcakes [Vegan] – One Green Planet
Share
© 2024 All Rights Reserved | Powered By Top 100 Recipes.
Welcome Back!

Sign in to your account

Lost your password?